Art of Woodworking Joints
Woodworking is an age-old craft that has captivated the imaginations of artisans and DIY enthusiasts alike for centuries. It’s a practice that involves transforming raw pieces of timber into functional or decorative items, and it’s much more than simply cutting and shaping wood. At its core, woodworking is an art form that demands skill, precision, and a deep understanding of the material. Making good woodworking joints is considered as an epitome of woodworking art.
Woodworking is often referred to as an “art” for good reason. It’s a creative endeavor that allows individuals to bring their ideas to life by shaping wood into beautiful, functional objects. From intricately designed furniture to delicate carvings and sturdy structures, woodworking offers a unique platform for self-expression and creativity. The art of woodworking extends beyond mere craftsmanship; it’s a means of connecting with the raw materials and the tools used to transform them.
As you delve into the world of woodworking, you’ll soon discover that each piece you create tells a story. The grain patterns, the choice of wood, the design, and, most importantly, the joints used to hold it all together, all contribute to the narrative of the final product. This is where the importance of woodworking joints and joinery techniques comes into play.
Importance of Woodworking Joints and Joinery Techniques
Woodworking joints and joinery techniques are the unsung heroes of any wooden creation. They play a pivotal role in determining the overall quality, stability, and aesthetics of the finished piece. A well-executed joint can turn a basic project into a work of art, while a poorly constructed joint can lead to structural instability and, ultimately, disappointment.
The significance of mastering woodworking joints and joinery techniques can be broken down into several key points:
- Structural Integrity: Joints are what hold your woodworking projects together. They create bonds between pieces of wood, ensuring that they stay connected and bear the load placed upon them. A solid joint can make the difference between a sturdy, durable piece and one that quickly falls apart.
- Aesthetic Appeal: The type of joint you choose can significantly impact the appearance of your project. Different joints offer unique visual characteristics, and the choice of joint can be as much a design decision as a functional one. Well-executed joinery can enhance the overall aesthetics of your work.
- Craftsmanship: Crafting precise joints requires skill and attention to detail. As you master various joinery techniques, you’ll develop a sense of pride in your work, knowing that your creations are the result of your expertise and dedication to the craft.
- Versatility: Joinery techniques are versatile and can be applied to a wide range of woodworking projects, from basic home repairs to complex furniture making. The more you learn about joinery, the more versatile and capable you become as a woodworker.
Understanding Woodworking Joints
Woodworking joints are the fundamental building blocks of any woodwork project. They are the points at which two or more pieces of wood are connected to create a structurally sound and aesthetically pleasing final product. Understanding these joints is crucial for any woodworker, whether you’re a beginner or an experienced craftsman.
What are woodworking joints?
Woodworking joints are specialized connections or intersections where two or more pieces of wood come together. These connections can be crafted through a variety of techniques and methods, each tailored to suit the specific needs of a project. The purpose of these joints can range from providing structural support to enhancing the overall appearance of the final piece.
The function of woodworking joints
The primary functions of woodworking joints are as follows:
- Structural Support: Joints play a pivotal role in providing strength and stability to a woodwork project. They are responsible for distributing the weight and forces acting on the piece, ensuring that it remains solid and can withstand various forms of stress.
- Flexibility: Joints can provide flexibility in design by allowing the wood pieces to move relative to each other. For instance, in a chair, you might want the backrest to recline slightly, and the joint connecting the backrest to the seat allows for this movement.
- Aesthetic Enhancement: Joints are not only functional but also contribute to the visual appeal of a piece. A well-crafted joint can become a design feature, showcasing the craftsmanship and attention to detail of the woodworker.
Factors to consider when choosing a joint
When deciding on the type of joint to use for a project, there are several important factors to consider:
- Wood Type: The type of wood you’re working with plays a significant role in choosing the right joint. Some woods are harder, while others are softer, and they have different characteristics that may affect the choice of joint. For instance, hardwoods are often more suitable for intricate joints like dovetails, while softwoods may work well with simpler joints like butt joints.
- Project Purpose: The intended use of the piece you’re creating is crucial. A joint used for a decorative wall shelf will differ from one used in constructing a heavy-duty workbench. Consider the intended load, movement, and stress the piece will endure.
- Aesthetic Preferences: Your personal design preferences and the desired appearance of the final product also come into play. Some joints, like dovetails or miter joints, offer a more refined and polished look, while others, like butt joints or rabbet joints, may be simpler but equally functional.
Types of woodworking joints
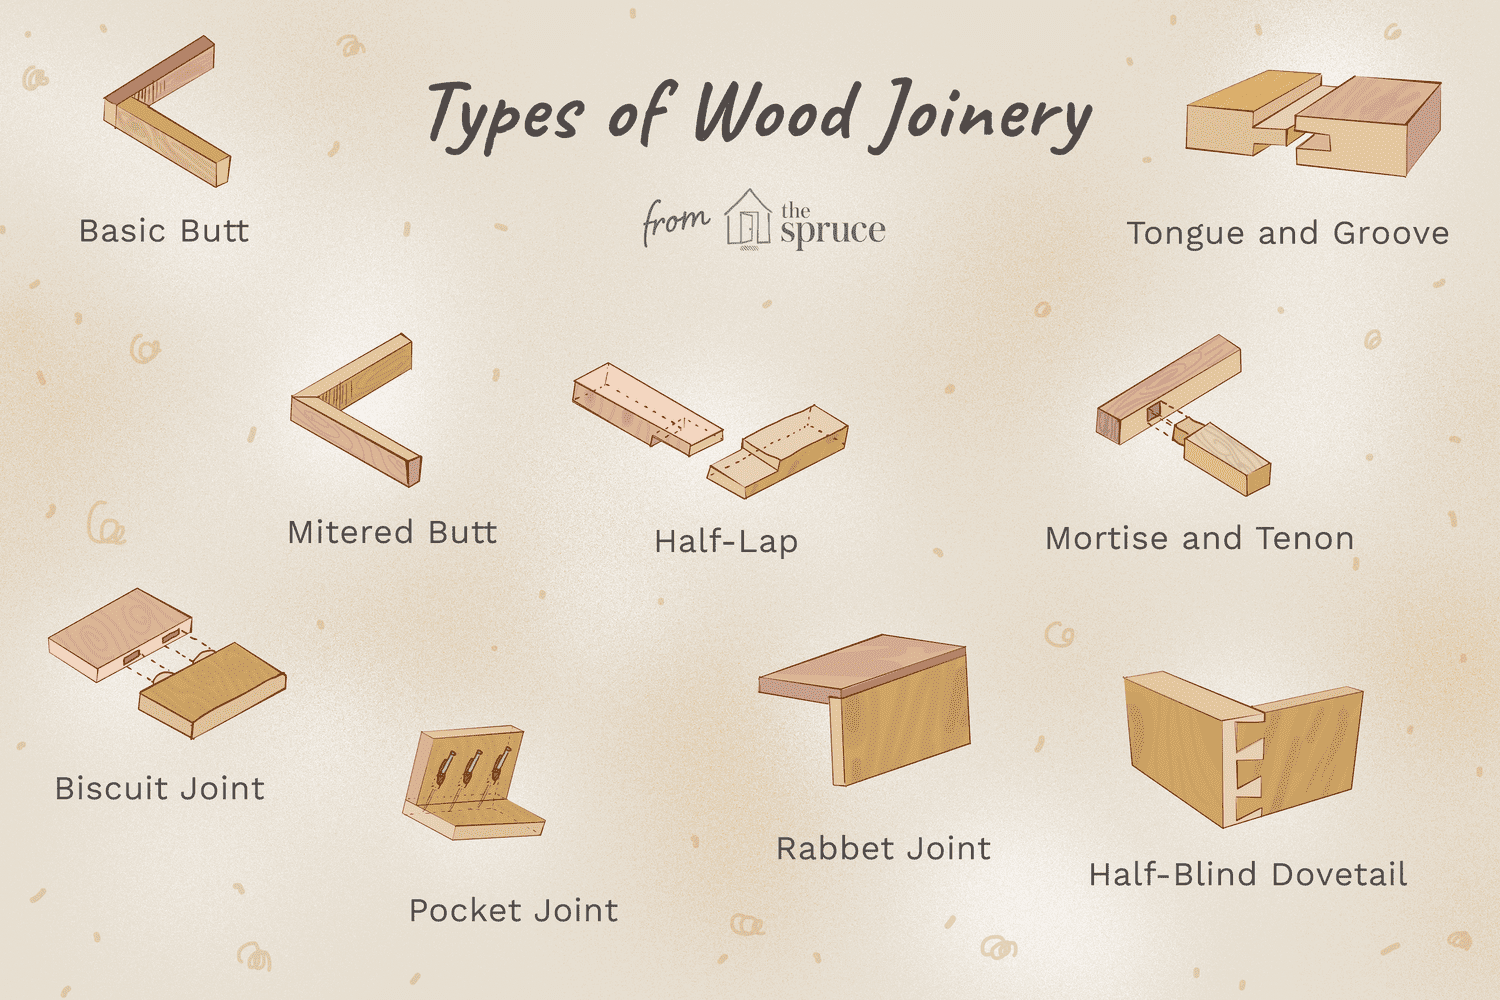
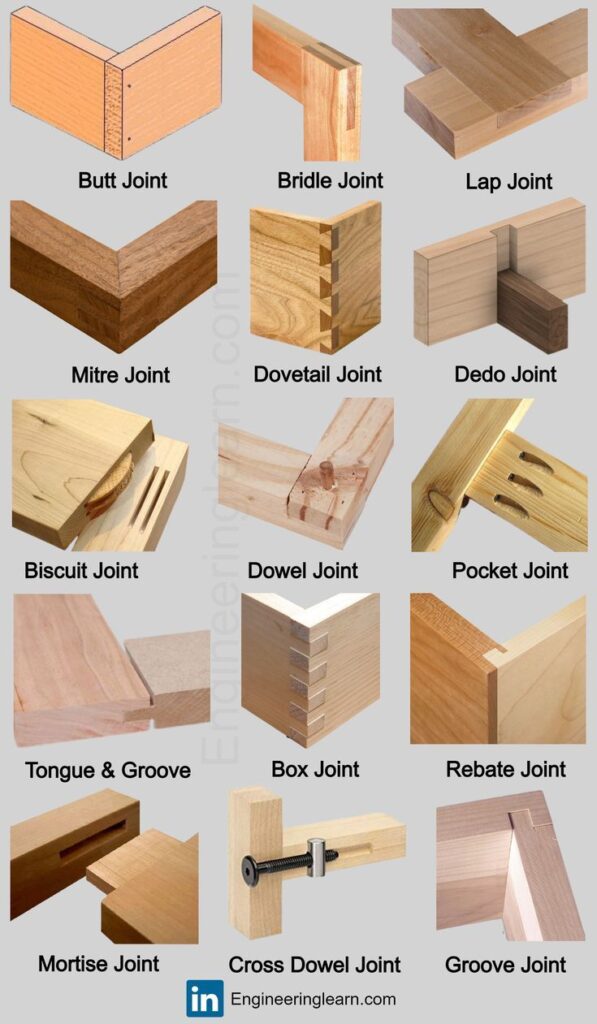
There is a wide variety of woodworking joints to choose from, each with its own set of characteristics, advantages, and ideal applications. Some common types of woodworking joints include:
- Butt Joints: A basic joint where the end of one piece of wood is simply joined with the face of another. These are simple but may lack strength and need reinforcement.
- Dovetail Joints: Recognizable by their interlocking, wedge-shaped fingers, dovetail joints are known for their strength and are often used in drawers and fine furniture.
- Mortise and Tenon Joints: This joint consists of a hole (mortise) and a corresponding protrusion (tenon). They are robust and used in structural components like tables and chairs.
- Finger Joints: Also known as box joints, they have interlocking rectangular “fingers.” They are often used in box construction and allow for a large gluing surface.
- Dado and Groove Joints: A groove (slot) is cut into one piece of wood, and another piece slides into it, creating a strong and flush connection. Common in bookshelves and cabinetry.
- Rabbet Joints: These joints have one board notched to accept the other, creating a smooth, flush connection. Often used in frame construction.
- Miter Joints: In a miter joint, two pieces are cut at an angle and joined to form a 90-degree corner. Common in picture frames and moldings.
- Half-Lap Joints: Each piece has half its thickness removed, creating a flush connection. Useful for building frameworks and bracing.
- Bridle Joints: Bridle joints combine a tenon and a half-lap joint, providing a strong and visually appealing connection. They are often used in constructing tables and benches.
Joint Strength and Durability
The strength and durability of a joint depend on various factors, including the joint type, the quality of workmanship, and the materials used. For instance, dovetail and mortise and tenon joints are known for their strength, while butt joints may require additional reinforcement. Proper preparation and precise cutting are essential for creating robust and long-lasting joints.
Joinery Techniques
Precision and Accuracy
Achieving precision and accuracy is paramount in woodworking, as even the slightest deviation can lead to ill-fitting joints and compromised structural integrity. To ensure your joinery work is top-notch, here are some key aspects to consider:
- Quality Workbench: Start with a sturdy and flat workbench. A well-leveled work surface is essential for accurate assembly and joint fitting. Ensure your workbench is at a comfortable working height.
- Sharp Tools: Sharp cutting tools are a woodworker’s best friend. Dull tools can cause tear-out and imprecise cuts. Regularly sharpen your chisels, saws, and planes to maintain their cutting edge. Use sharpening stones, honing guides, and strops to keep your tools in optimal condition.
- Layout and Marking: Marking tools like marking gauges, pencils, and combination squares are indispensable for precise layout and marking of your wood. Use layout tools to transfer measurements and dimensions accurately onto your workpieces.
Measuring and Marking Tools
Proper measuring and marking are essential for creating precise joints. Some key tools to include in your arsenal are:
- Tape Measure: A tape measure is essential for measuring board lengths and dimensions accurately. Look for a tape measure with both metric and imperial measurements for versatility.
- Combination Square: This tool features a ruler and a 90-degree, adjustable square head, which is ideal for marking square lines and angles accurately. It’s a versatile tool for a wide range of woodworking tasks.
- Marking Gauge: A marking gauge is perfect for scoring lines along the grain of the wood. It ensures consistent and precise measurements when marking out mortises, tenons, and other joints.
- Sliding Bevel: The sliding bevel is used to transfer angles and create accurate miter joints. It allows you to set any angle and lock it in place for precise cutting.
Cutting Tools
- Hand Tools (e.g., Chisels, Saws, Planes)Hand tools are fundamental to woodworking, and using them with precision is an art in itself. Here are some key hand tools:
- Chisels: Chisels are vital for fine-tuning joints. Use them to clean up mortises, square corners, and pare wood for a snug fit. Keep them sharp for optimal performance.
- Saws: Different types of saws, such as crosscut saws and rip saws, serve specific purposes in woodworking. Select the appropriate saw for your task, and always cut along your marked lines accurately.
- Planes: Planes are used for smoothing, flattening, and shaping wood. They are invaluable for achieving flat surfaces and perfectly square edges. Learning to use planes effectively is a crucial skill in woodworking.
- Power Tools (e.g., Routers, Biscuit Joiners)Power tools can save time and effort while maintaining precision:
- Routers: Routers are versatile tools that can create decorative edges, dadoes, and grooves. They are ideal for intricate joinery work when used with precision jigs.
- Biscuit Joiners: Biscuit joiners are designed for creating strong and invisible biscuit joints. They cut matching slots in two pieces of wood, allowing for precise alignment and glue-up.
Adhesives and Fasteners
- Glue Types and Considerations
- Wood Glue (PVA): Wood glue is the go-to adhesive for most woodworking projects. It’s easy to work with, dries clear, and forms a strong bond. Ensure that surfaces are clean and apply an even layer of glue, and use clamps to hold the joint together until it sets.
- Epoxy: Epoxy is a versatile adhesive suitable for both porous and non-porous surfaces. It provides a strong, waterproof bond and is excellent for filling gaps in joints.
- Polyurethane Glue: Polyurethane glue expands as it cures, making it ideal for joints that may have small gaps. It’s also waterproof and can be used for outdoor projects.
- Nails and Screws
- Nails and screws are commonly used fasteners in woodworking. They can provide additional reinforcement for joints, especially in projects where strength is a priority. Use the right type and length of fastener for your specific joint, and pre-drill holes to prevent splitting.
Wood Preparation
- Surface Preparation
- Sanding: Achieving smooth and even surfaces is crucial for precise joinery. Start with rough-grit sandpaper and progress to finer grits for a polished finish. Always sand with the grain to prevent scratches.
- Edge Jointing and Planing
- To ensure straight and square edges for your joints, edge jointing and planing are essential. Use a jointer to create flat reference edges on your workpieces and a planer to achieve consistent thickness.
Safety Precautions in Joinery
Safety should always be a top priority in woodworking. Some key safety precautions include:
- Wearing safety goggles to protect your eyes from wood chips and dust.
- Using hearing protection to guard against the noise generated by power tools.
- Employing a dust mask or respirator to prevent inhaling fine wood particles.
- Keeping your work area clean and well-lit to reduce tripping hazards.
- Using push sticks and guards when working with power tools to prevent accidental injuries.
By paying careful attention to precision, using the right tools, and following safety precautions, you can ensure that your woodworking joints and joinery techniques are not only strong and durable but also aesthetically pleasing. These skills will serve as the foundation for your woodworking journey, allowing you to tackle a wide range of projects with confidence and mastery.
Step-by-Step Guide to Common Woodworking Joints
In this section, we will delve into the step-by-step process of creating various common woodworking joints, each with its unique characteristics and applications. Let’s explore these joints in detail:
A. Butt Joints
- How to Create a Strong Butt Joint
Butt joints are one of the simplest and most basic woodworking joints. They involve joining two pieces of wood by simply butting them together. While they may not be as decorative or strong as some other joints, with the right techniques, you can create a sturdy butt joint.
Materials and Tools:
- Two pieces of wood
- Wood glue
- Clamps
- Measuring and marking tools
Step-by-Step Guide:
a. Prepare the wood: Start by ensuring that the edges of both pieces of wood are flat, smooth, and square. If they’re not, use a plane and a square to make them as even as possible.
b. Mark the location: Measure and mark the location where you want to create the joint. Make sure the pieces are properly aligned.
c. Apply glue: Apply a thin, even layer of wood glue to one of the mating surfaces.
d. Join the pieces: Press the two pieces of wood together, aligning the marked location accurately. Use clamps to hold the pieces firmly in place while the glue dries.
e. Cleanup: Wipe off any excess glue that squeezes out, and let the joint dry as per the glue manufacturer’s instructions.
f. Reinforce: For added strength, you can further secure the joint by adding screws, nails, or dowels through the sides of the wood pieces, creating a “reinforced butt joint.”
B. Dovetail Joints
Dovetail joints are known for their exceptional strength and aesthetic appeal. They are commonly used in fine woodworking, particularly for creating drawers and boxes. The interlocking nature of the dovetails provides superior mechanical strength.
Materials and Tools:
- Two pieces of wood
- Dovetail saw
- Chisels
- Marking gauge
- Dovetail marker
- Mallet
- Wood glue
- Clamps
Step-by-Step Guide:
a. Mark the tails and pins: Using a marking gauge and a dovetail marker, carefully mark the tails on one piece and the pins on the other. The tails have a sloping angle, while the pins have corresponding notches.
b. Cut the tails: Use a dovetail saw to make the cuts for the tails, following the marked lines. It’s crucial to make precise, straight cuts.
c. Remove the waste: Use chisels to remove the waste wood between the tails. Take your time to ensure a tight fit.
d. Mark the pins: Transfer the tail layout to the pin board to create matching pins.
e. Cut the pins: Make the cuts for the pins, ensuring they correspond precisely to the tails.
f. Test fit: Dry-fit the pieces to check for any gaps and make necessary adjustments.
g. Apply glue and assemble: Once satisfied with the fit, apply wood glue to the joint surfaces, assemble the pieces, and use clamps to hold them together.
h. Cleanup: Remove any excess glue and let the joint dry completely.
Dovetail joints require practice to master, but the result is a visually stunning and incredibly strong joint that will enhance your woodworking projects.
Advanced Joinery Techniques
A. Inlay and Marquetry
Inlay and marquetry are advanced woodworking techniques that involve incorporating intricate and decorative designs into wooden surfaces. These techniques can add a touch of artistry and sophistication to your woodworking projects, turning them into unique and visually stunning pieces. Here’s a step-by-step guide on how to create intricate inlay designs:
a. Material Selection: To start, you’ll need contrasting woods for your inlay. Exotic hardwoods like ebony, rosewood, and maple are popular choices because of their striking colors and grain patterns. Choose materials that will complement the base wood of your project.
b. Design Planning: Before you begin cutting and inlaying, create a detailed design plan. Decide where you want the inlay to go and what patterns or shapes you want to incorporate. You can create your design using design software, a hand-drawn sketch, or stencils.
c. Cutting the Inlay Pieces: Use a fine-toothed saw or a scroll saw to carefully cut out the inlay pieces according to your design. It’s essential to make precise cuts to ensure a seamless fit.
d. Preparing the Base Wood: Mark the area on your base wood where you want to insert the inlay. Create a shallow recess in the base wood using a router or chisel. Ensure that the recess is the same thickness as your inlay pieces.
e. Gluing the Inlay: Apply a thin layer of woodworking glue to the recess and carefully place the inlay pieces into their designated positions. Be cautious not to use excessive glue, as it can squeeze out and mar the surface.
f. Sanding and Leveling: Once the glue has dried, use a sanding block to level the inlay with the base wood. Start with coarse-grit sandpaper and gradually progress to finer grits until the surface is smooth and flush.
g. Finishing: Apply a suitable finish to your project to protect the wood and enhance the beauty of the inlay. Clear finishes like varnish or lacquer work well for showcasing the inlay’s details.
B. Dovetail and Box Joints for Fine Woodworking
Dovetail and box joints are revered for their strength and aesthetic appeal, making them a favorite choice for fine woodworking. These joints are frequently used in creating drawers, boxes, and cabinetry. Here’s how to master dovetail and box joints:
a. Tools and Materials: – A dovetail saw or a fine-toothed handsaw – Chisels – A marking gauge or marking knife – A dovetail or box joint jig (optional) – Suitable wood for your project
b. Marking and Layout: Begin by marking the thickness of the boards and the width of the pins and tails. You can use a marking gauge or marking knife for precision. Ensure that the angles for the tails and pins are identical.
c. Cutting the Tails: Secure the workpiece in a vise and cut the tails using a dovetail saw. Follow your layout lines and cut carefully to achieve clean and precise results.
d. Cutting the Pins: For the pins, use a chisel and make straight cuts perpendicular to the surface of the wood. Create multiple cuts and then chisel away the waste wood to form the pins.
e. Fitting the Joints: Test the fit of the pins and tails. They should fit snugly, without any gaps. If adjustments are needed, carefully pare away small amounts of wood until the joint fits perfectly.
f. Gluing and Clamping: Once you are satisfied with the fit, apply woodworking glue to the joint and assemble the pieces. Use clamps to secure the joint while the glue dries.
g. Finishing: After the glue has dried, sand the joint to ensure a seamless surface. You can then apply your chosen finish to protect and beautify the project.
C. Compound and Hybrid Joints
Compound and hybrid joints are advanced joinery techniques that combine two or more different joint types to achieve specific design and structural goals. These joints are often used in custom furniture and woodworking projects that require a high level of craftsmanship. Here’s an overview of these techniques:
- Compound Joints: Compound joints are made by combining two or more traditional woodworking joints into a single, complex joint. These joints can be used to create unique shapes or structures, and they require careful planning and execution. Common examples include dovetail and mortise and tenon combinations.
- Hybrid Joints: Hybrid joints incorporate different materials or non-wood elements, such as metal or glass, into traditional wooden joints. These joints are popular in modern and contemporary woodworking projects and offer endless design possibilities.
Creating compound and hybrid joints requires a deep understanding of woodworking principles and precise execution. They are often used in one-of-a-kind, custom projects where aesthetics and functionality are of paramount importance.
D. Wood Bending and Steam Bending Techniques
Wood bending techniques allow woodworkers to create curved and sculptural elements in their projects. These techniques are particularly useful for making chair backs, curved moldings, and artistic pieces. Among these techniques, steam bending is one of the most common methods. Here’s how to use steam bending to shape wood:
a. Material Selection: Choose the type of wood that is suitable for bending. Hardwoods with even grain patterns, such as oak, ash, or cherry, are often used. The wood should be prepared by soaking it in water for several days to increase its flexibility.
b. Building a Steam Box: A steam box is a container that produces steam to soften the wood. Construct a steam box using a wooden frame and cover it with a non-leaking material such as plywood or metal. Attach a steam source, such as a steam generator or a large pot with a hose, to one end of the box.
c. Steaming the Wood: Place the prepared wood into the steam box, making sure it’s suspended above the bottom of the box to avoid direct contact with water. Steam the wood for an appropriate amount of time based on its thickness and species. This can range from 30 minutes to a few hours.
d. Bending the Wood: Once the wood is thoroughly steamed, carefully remove it from the steam box and bend it to the desired shape. Use a bending form or jig to hold the wood in its curved shape until it cools and dries. This process is known as “setting” the wood.
e. Drying and Setting: Allow the wood to dry and set in the bending form for an extended period, often several days. This ensures that the wood retains its curved shape once removed from the form.
f. Trimming and Sanding: After the wood has dried and set, trim any excess material and sand the curved surface to a smooth finish.
Wood bending and steam bending techniques require patience and practice to master. The process involves precise timing and temperature control to achieve the desired results. Additionally, safety precautions should be taken when working with steam and hot water.
Tips for Perfecting Your Joinery Skills
A. Practice and Patience
Perfecting woodworking joinery requires a great deal of practice and patience. It’s important to understand that mastering these techniques is not something that happens overnight. Here are some tips for honing your skills:
- Start with Basic Joints: Begin by mastering the fundamental woodworking joints like butt joints, dado and groove joints, and mortise and tenon joints. These are the building blocks of joinery and provide a solid foundation for more complex work.
- Repeat, Repeat, Repeat: Repetition is key to improving your skills. Practice the same joint multiple times until you achieve a perfect fit. Each attempt will teach you something new about the process, tools, and your own abilities.
- Use Scrap Wood: Keep a stash of scrap wood to practice on. This way, you won’t worry about ruining your project materials and can focus solely on improving your skills.
- Stay Patient: Woodworking is not a race. Take your time, especially when you’re still learning. Rushing can lead to mistakes and accidents.
B. Learn from Experienced Woodworkers
One of the best ways to improve your joinery skills is to learn from experienced woodworkers. They can offer valuable insights, tips, and guidance to help you progress in your craft. Here’s how to make the most of learning from others:
- Find a Mentor: If possible, seek out a seasoned woodworker who is willing to mentor you. A mentor can provide direct feedback, answer your questions, and offer hands-on guidance.
- Online Communities: Join online forums, social media groups, or woodworking communities where you can connect with experienced woodworkers. They often share their knowledge, experiences, and even video tutorials.
- Books and Tutorials: There are numerous books, articles, and video tutorials available that cover various joinery techniques. These resources can be invaluable in expanding your knowledge.
- Workshops and Classes: Consider taking woodworking classes or attending workshops in your area. These provide an opportunity to learn in a structured environment and receive direct feedback.
C. Experiment with Different Woods and Joint Types
Woodworking is a diverse craft, and there’s no shortage of wood species and joinery techniques to explore. Here’s why experimenting with different materials and joint types is beneficial:
- Wood Selection: Different woods have unique characteristics, such as grain pattern, hardness, and color. Experimenting with various wood types allows you to understand how they behave and how different joints perform with them.
- Variety of Joints: Try your hand at various joints beyond the basics. Experiment with dovetail joints, bridle joints, and complex joinery like compound or hybrid joints. This will expand your skill set and challenge you to think creatively.
- Customization: Different projects may call for specific joints. By learning various techniques, you can tailor your approach to the project at hand, ensuring a strong and aesthetically pleasing result.
D. Invest in Quality Tools and Equipment
Investing in quality tools and equipment is crucial for improving your joinery skills. Here’s why it matters:
- Accuracy and Precision: High-quality tools are more precise and durable, making it easier to achieve accurate joints. Cheaper tools may not hold up to the rigors of woodworking, leading to inaccuracies.
- Safety: Quality tools are also safer to use, as they are less likely to malfunction or cause accidents. Safety should always be a top priority in your workshop.
- Long-Term Investment: While quality tools may have a higher upfront cost, they are a long-term investment. They last longer, perform better, and ultimately save you money in the long run.
E. Keep Safety a Top Priority
Safety is paramount in woodworking. Even the most skilled woodworkers prioritize safety in their workshops. Here are some key safety tips to remember:
- Wear Appropriate Safety Gear: Always wear safety glasses, hearing protection, and dust masks when working with wood and power tools. Depending on the task, consider additional safety equipment, such as gloves or a respirator.
- Maintain Your Tools: Regularly inspect and maintain your tools and equipment. Ensure that blades, bits, and guards are in good condition and properly adjusted.
- Learn Proper Technique: Study and practice proper tool handling and woodworking techniques. This will help prevent accidents and ensure precision in your work.
- Keep Your Workspace Clean: A cluttered and disorganized workspace can be a hazard. Maintain a clean, organized area to prevent tripping, slipping, or accidents caused by misplaced tools.
- Plan Ahead: Before making a cut or starting a joint, plan your work carefully. Measure twice and cut once to reduce the likelihood of errors.
Conclusion
Mastering the craft of woodworking joints and joinery techniques is a multifaceted journey that combines patience, skill development, learning from experienced artisans, versatility in wood selection and joint applications, investment in quality tools, and an unwavering commitment to safety. It’s a discipline where practice is not just recommended but essential, where each repetition brings you closer to perfection, and where the foundation of your woodworking expertise is built on the understanding and execution of the basic joints. Learning from seasoned woodworkers, whether through mentorship, online communities, or educational resources, enriches your knowledge and helps you navigate the intricacies of joinery. Experimenting with different woods and joint types broadens your horizons, enabling you to tackle a wide array of projects while honing your craftsmanship. Investing in quality tools and equipment is an investment in precision, durability, and long-term success. Always, safety must remain at the forefront of your woodworking endeavors, ensuring that your love for the craft does not come at the expense of your well-being. When you blend these elements into your woodworking journey, you embark on a path towards becoming a skilled and accomplished woodworker, capable of creating intricate, durable, and aesthetically pleasing woodworking projects, all while experiencing the profound satisfaction that comes with mastering the art of joinery.