
Wood Finishes and Stains: Unlocking the Secrets to Beautiful and Lasting Results
Wood is a beautiful and versatile material that can be used for a variety of purposes, from furniture and flooring to buildings and decorative pieces. But to get the most out of your wood projects, you need to know how to finish and stain them properly. The right finish and stain can help protect the wood from the elements, enhance its natural beauty, and make it more durable. However, with so many different wood finishes and stains available on the market, it can be difficult to know which one to choose. In this post, we will be unlocking the secrets to beautiful and lasting results with wood finishes and stains. We will discuss the different types of wood finishes and stains available, the best application methods, and tips for achieving the perfect result. Whether you’re a seasoned woodworker or a DIY enthusiast, you’re sure to find some helpful information in this guide.
Wood Finishes and Stains
Wood finishes and stains are essential components in the world of woodworking and furniture making. They not only enhance the natural beauty of wood but also provide protection and longevity to your creations. Whether you are a seasoned woodworker or a DIY enthusiast, understanding the basics of wood finishes and stains is crucial to achieve stunning and long-lasting results.
Wood finishes are coatings applied to the surface of wood to protect it from moisture, UV rays, and other environmental factors. They also add depth, richness, and shine to the wood, bringing out its natural grain patterns and color variations. From clear finishes that preserve the wood’s natural appearance to pigmented finishes that add color, there are various options to choose from based on your desired outcome.
On the other hand, wood stains are used to alter the color of the wood while still allowing its grain patterns to show through. Stains penetrate into the wood fibers, transforming its hue and highlighting its unique characteristics. Whether you prefer a classic oak color or a darker walnut shade, there is a wide range of wood stains available to suit your preferences.
Understanding the different types of wood finishes and stains, as well as their application techniques, is crucial to achieve the desired results. Factors such as the type of wood, desired sheen, level of durability, and intended use of the finished piece should all be considered when selecting the appropriate finish or stain.
We will delve deeper into the world of wood finishes and stains, exploring the various types, application methods, and tips for achieving beautiful and lasting results. Whether you are looking to refinish an old piece of furniture or embark on a new woodworking project, this guide will equip you with the knowledge and techniques to unlock the secrets of wood finishes and stains. So, let’s dive in and discover the transformative power of these essential woodworking elements.
Purpose of Wood Finishes and Stains
To truly unlock the secrets to beautiful and lasting results in woodworking, it is crucial to understand the purpose of wood finishes and stains. These products are not just about adding color or shine to your wood projects; they serve important functional purposes too.
- First and foremost, wood finishes are designed to protect the wood from external elements that can damage its natural beauty and integrity. Whether it’s moisture, UV rays, or everyday wear and tear, a good wood finish acts as a barrier that shields the wood surface, preventing it from warping, cracking, or deteriorating over time.
- Moreover, wood finishes can enhance the aesthetics of your woodwork by accentuating the grain, color, and texture of the wood. They bring out the natural beauty of the material, adding depth and richness to the overall appearance. From a natural, clear finish that highlights the wood’s inherent features to a stain that adds a touch of color, the right choice of finish can elevate the visual appeal of your project to new heights.
- Additionally, wood finishes can also improve the durability of the wood, making it more resistant to scratches, stains, and other forms of damage. By penetrating the wood fibers and creating a protective layer, finishes can prolong the lifespan of your woodwork and ensure that it retains its beauty for years to come.
Types of Wood Finishes and Stains
When it comes to enhancing the natural beauty of wood and ensuring its long-lasting durability, choosing the right type of finish or stain is crucial. There is a wide array of options available, each with its own unique characteristics and benefits. Understanding the different types of wood finishes and stains will empower you to make an informed decision that aligns with your desired aesthetic and functional goals.
- Varnishes: Varnishes are popular for their ability to provide a protective and glossy finish. They create a hard and durable coating that shields the wood from moisture, scratches, and UV damage. Varnishes come in various sheens, ranging from high gloss to satin, allowing you to achieve the desired level of shine.
- Oils: Oil finishes penetrate deep into the wood, enhancing its natural beauty and providing a rich, warm glow. They nourish the wood fibers and offer a more natural and subtle look compared to varnishes. Oils are particularly suitable for open-grain woods like oak and walnut, as they accentuate the unique grain patterns.
- Lacquers: Lacquers are known for their quick drying time and excellent durability. They create a hard and smooth finish that enhances the wood’s natural color. Lacquers are available in various sheens, from matte to high gloss, offering versatility in achieving different looks.
- Stains: Wood stains are used to alter the color of the wood while allowing the grain patterns to show through. They come in both oil-based and water-based formulations. Oil-based stains offer deeper and richer colors, while water-based stains are more environmentally friendly and have a quicker drying time.
- Shellacs: Shellac finishes provide a traditional and elegant look to wood surfaces. They offer good protection against water and heat and can be easily repaired or refreshed. Shellac is versatile and can be used as a standalone finish or as a basecoat for other finishes.
- Wax: Wax finishes provide a soft and smooth sheen, enhancing the natural beauty of the wood. They offer moderate protection against moisture and scratches but may require more frequent maintenance compared to other finishes. Wax is often used as a topcoat over other finishes to add depth and luster.
Factors to consider before choosing a wood finish or stain
Choosing the right wood finish or stain for your project is crucial to achieving beautiful and lasting results. There are several factors to consider before making your decision, ensuring that you choose the perfect finish for your specific needs.
- Firstly, think about the type of wood you are working with. Different wood species have unique characteristics that can affect how they absorb and react to different finishes. Some woods, like oak or mahogany, have open pores that can absorb stains more deeply, while others, such as maple or cherry, have a tighter grain that may require a different approach. Understanding the properties of your wood will help you select a finish that enhances its natural beauty.
- Consider the intended use of the finished piece. Is it a high-traffic area, like a kitchen countertop or a dining table? In that case, durability and resistance to moisture and heat become paramount. Opting for a finish with protective properties, such as polyurethane or lacquer, will help ensure the longevity of your project. On the other hand, if it’s a decorative item or furniture that won’t be subjected to heavy use, you have more flexibility in choosing a finish based on aesthetics alone.
- Take into account the desired appearance and color of the finished piece. Wood finishes and stains can dramatically alter the look of the wood, from enhancing its natural tones to completely transforming its color. Transparent finishes like varnish or oil-based finishes allow the wood’s natural beauty to shine through, while stains can provide a range of hues and tones. It’s essential to test different finishes on a sample piece of the same wood to see how they interact and achieve the desired outcome.
- Consider the application method and your skill level. Some finishes, like spray finishes or wipe-on polyurethane, are easier to apply and require less expertise to achieve professional-looking results. Others, such as oil-based finishes or certain types of stains, may require more skill and experience to ensure even application and avoid blotching or streaking. Assess your comfort level and available tools before settling on a particular finish.
- Lastly, think about the maintenance and future care of the finished piece. Some finishes may require periodic reapplication or touch-ups to maintain their appearance and protection. Others may be more resistant to wear and tear, requiring minimal upkeep. Understanding the long-term maintenance requirements will help you choose a finish that aligns with your desired level of commitment.
Preparing the Wood Surface for Finishing
Before applying any wood finish or stain, it is crucial to properly prepare the wood surface. This step is often overlooked, but it plays a significant role in achieving a beautiful and lasting result.
- The first step in preparing the wood surface is to ensure it is clean and free from any dirt, dust, or debris. Use a soft brush or vacuum cleaner to remove loose particles from the surface. For stubborn dirt or grime, a mild soap solution can be used, followed by a thorough rinse and drying.
- Once the surface is clean, it is important to address any imperfections such as dents, scratches, or unevenness. Use a wood filler or putty to fill in any holes or gaps, and sand the surface smooth using sandpaper. This not only improves the appearance of the wood but also ensures a more even application of the finish or stain.
- Next, it is essential to consider the wood’s moisture content. Wood that is too wet or too dry can affect the absorption and adhesion of the finish or stain. Use a moisture meter to determine the moisture content of the wood and allow it to reach the recommended range before proceeding with the finishing process.
- Before applying the chosen finish or stain, it is advisable to perform a test on a small inconspicuous area or a scrap piece of the same wood to ensure compatibility and desired results. This allows you to make any necessary adjustments or changes before committing to the entire surface.
- Finally, it is important to ensure a smooth and even application of the finish or stain. Use a high-quality brush, roller, or sprayer, depending on the product and desired outcome. Follow the manufacturer’s instructions regarding the proper application technique and drying times.
Applying wood finishes: step-by-step guide
Applying wood finishes may seem like a daunting task, but with the right knowledge and technique, you can achieve beautiful and lasting results. Here is a step-by-step guide to help you unlock the secrets of applying wood finishes like a pro.
- Step 1: Prepare the wood surface: Before applying any finish, it’s crucial to prepare the wood surface properly. Start by sanding the wood to remove any imperfections, rough spots, or previous finishes. Use fine-grit sandpaper, working in the direction of the grain to achieve a smooth and even surface. Once sanded, make sure to remove any dust or debris with a tack cloth.
- Step 2: Choose the right finish: There are various types of wood finishes available, such as varnish, stain, lacquer, or oil-based finishes. Consider the type of wood you’re working with and the desired outcome to select the appropriate finish. Each finish has its own application method and drying time, so read the instructions carefully before proceeding.
- Step 3: Apply the first coat: Using a brush, roller, or cloth, apply the first coat of finish in long, even strokes, following the direction of the wood grain. Make sure to cover the entire surface evenly, avoiding any puddles or drips. Allow the first coat to dry according to the manufacturer’s instructions.
- Step 4: Sand between coats: To achieve a smooth and flawless finish, lightly sand the surface between coats. Use fine-grit sandpaper or steel wool, gently buffing the wood in the direction of the grain. This step helps to smooth out any imperfections, remove raised wood fibers, and create a better bond between coats.
- Step 5: Apply additional coats: Depending on the desired level of protection and depth of color, apply additional coats of finish. Each coat should be applied following the same technique as the first coat, ensuring even coverage and allowing proper drying time between coats. Generally, two to three coats are recommended for optimal results.
- Step 6: Finishing touches: Once the final coat has dried, inspect the surface for any imperfections or rough spots. If necessary, lightly sand those areas and apply a touch-up coat of finish. For added protection and a smoother feel, you can also consider applying a layer of wax or polish to enhance the luster and durability of the wood.
Choosing the Right Finish for Different Types of Wood
Choosing the right finish for different types of wood is crucial in achieving beautiful and lasting results for your woodworking projects. Each type of wood has its own unique characteristics and requires a specific finish to enhance its natural beauty and protect it from wear and tear.
- For lighter woods like pine or maple, a clear or light-colored finish is often preferred to maintain their natural appearance. Clear finishes, such as varnish or lacquer, allow the natural grain and color of the wood to shine through while providing a protective layer against moisture and UV damage.
- On the other hand, darker woods like mahogany or walnut can benefit from finishes that enhance their rich tones and add depth to the wood’s appearance. Oil-based finishes, like Danish oil or tung oil, are popular choices for these types of wood as they penetrate deep into the fibers, enhancing the natural color and providing a warm, lustrous finish.
- For outdoor projects or woods that are prone to moisture exposure, such as cedar or teak, it’s important to choose a finish that offers excellent protection against the elements. Exterior-grade varnishes or marine-grade finishes are designed to withstand moisture, UV rays, and temperature fluctuations, ensuring your wood stays beautiful and protected for years to come.
- In addition to considering the type of wood, you should also take into account the desired level of sheen. Finishes come in various sheen levels, ranging from matte to high gloss. Matte finishes provide a more natural, subtle look, while high gloss finishes offer a reflective, shiny appearance. Semi-gloss and satin finishes fall in between, providing a balance of sheen and durability.
- Before applying any finish, it’s essential to properly prepare the wood by sanding it to a smooth surface. This ensures that the finish adheres evenly and creates a flawless result. Additionally, always follow the manufacturer’s instructions when applying the finish, including the recommended number of coats and drying times.
Enhancing the Natural Beauty of Wood with Stains
Enhancing the natural beauty of wood with stains is a popular technique that can transform the appearance of any wooden surface. Whether you are working on a small DIY project or tackling a larger woodworking endeavor, choosing the right stain can make a significant difference in the final outcome.
Wood stains come in a wide variety of colors and finishes, allowing you to customize the look of your project to suit your personal taste and style. From light and natural tones that highlight the wood’s grain to rich, dark shades that add depth and sophistication, the possibilities are endless.
One of the great advantages of using wood stains is their ability to bring out the unique characteristics of different wood species. Each type of wood has its own distinct grain patterns and color variations, and stains can help accentuate these natural features. For example, a light stain applied to oak can enhance its prominent grain, while a darker stain can add richness and warmth to mahogany.
Before applying a stain, it is important to prepare the wood surface properly. This typically involves sanding the wood to create a smooth and even surface, ensuring that the stain will penetrate evenly. Additionally, it is essential to test the stain on a small, inconspicuous area of the wood to ensure that it achieves the desired color and effect.
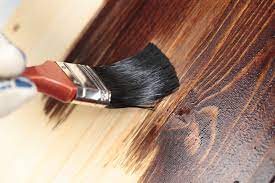
When applying the stain, it is crucial to work in the direction of the wood grain to achieve a uniform appearance. Using a brush, rag, or sponge, apply the stain evenly and allow it to penetrate the wood for the recommended time specified by the manufacturer. Afterward, wipe away any excess stain with a clean cloth.
To protect the stained wood and ensure its longevity, it is essential to apply a suitable topcoat such as polyurethane or varnish. This will not only provide a protective barrier against moisture and wear but also enhance the overall beauty of the stained wood.
Tips and Tricks for Achieving Professional-Looking Results
When it comes to achieving professional-looking results with wood finishes and stains, there are a few tips and tricks that can make a significant difference in the outcome of your project. These techniques, used by experienced woodworkers and craftsmen, can help you unlock the secrets to beautiful and lasting results.
Firstly, it is crucial to properly prepare the wood surface before applying any finishes or stains. This involves sanding the wood to create a smooth and even surface. Start with a coarse grit sandpaper and gradually work your way up to finer grits, ensuring that all imperfections, such as scratches or dents, are smoothed out.
It is essential to choose the right type of finish or stain for your project. Consider the desired look, durability, and the type of wood you are working with. Whether you opt for a clear varnish to enhance the natural beauty of the wood or a colored stain to add depth and character, selecting the appropriate product will greatly impact the final result.
Before applying the finish or stain, always test it on a small, inconspicuous area of the wood to ensure that it achieves the desired effect. This way, you can make any necessary adjustments or modifications before committing to the entire project.
When applying the finish or stain, it is crucial to follow the manufacturer’s instructions carefully. Apply thin, even coats using a high-quality brush or a lint-free cloth, working with the grain of the wood. Avoid overloading the brush or cloth, as this can result in drips, streaks, or uneven coverage.
Allow each coat to dry fully before applying subsequent coats, and lightly sand between coats to ensure a smooth and flawless finish. This step is especially important when using a clear varnish or lacquer to achieve a glass-like, mirror finish.
Consider applying a protective topcoat to enhance the longevity and durability of the finish or stain. Depending on your project, a polyurethane or wax topcoat can provide an extra layer of protection against moisture, scratches, and general wear and tear.
By following these tips and tricks, you can achieve professional-looking results with your wood finishes and stains. With proper preparation, careful product selection, and meticulous application techniques, you can unlock the secrets to creating beautiful and lasting finishes that showcase the natural beauty of wood.
Conclusion: Creating Beautiful and Lasting Results with Wood Finishes and Stains
Mastering the art of wood finishes and stains can truly unlock the secrets to creating beautiful and lasting results in your woodworking projects. By understanding the various types of wood finishes available and their unique properties, you can enhance the natural beauty of the wood while also providing protection against wear and tear. Remember to always prepare the wood surface properly before applying any finish or stain. This includes sanding, cleaning, and ensuring the wood is free from any imperfections or contaminants. Taking the time to properly prepare the wood will ensure a smooth and even application of the finish. When selecting a wood finish or stain, consider the desired level of sheen, color, and durability. Whether you choose a clear finish to highlight the natural beauty of the wood or opt for a stain to add color and character, make sure to test the product on a small, inconspicuous area before applying it to the entire project. Application technique plays a crucial role in achieving professional-looking results. Whether you choose to brush, wipe, or spray the finish, follow the manufacturer’s instructions and apply thin, even coats. Allow sufficient drying time between coats and sand lightly to achieve a smooth surface. Lastly, don’t forget the importance of regular maintenance and upkeep. Wood finishes and stains may require occasional touch-ups or reapplication to maintain their beauty and protective properties. Follow the suggested maintenance guidelines for the specific product you choose to ensure long-lasting results.
We hope you found our blog post on wood finishes and stains insightful and helpful in unlocking the secrets to achieving beautiful and lasting results. From understanding the different types of wood finishes to choosing the right stain for your project, we covered it all. By following the tips and techniques outlined in this article, you’ll be able to enhance the natural beauty of wood while ensuring its longevity. So, go ahead and unleash your creativity while creating stunning pieces with the knowledge gained from this blog post. Don’t forget to share your amazing woodworking creations with us!