Importance of Tile Saws Ryobi in Tiling Projects
Tile saws are indispensable tools for both do-it-yourself (DIY) enthusiasts and professional tile installers. These versatile machines are essential for achieving precise and clean cuts in various types of tiles, ensuring that your tiling projects look polished and professional. Whether you’re renovating your kitchen, bathroom, or working on a large-scale commercial project, a reliable tile saw like the Ryobi Tile Saw can make all the difference in the quality and efficiency of your work. Tile saws provide the ability to cut tiles accurately to size, shape, or angle, ensuring they fit seamlessly into your design. This precision is crucial for achieving a flawless finish and preventing costly mistakes. In this blog post, we’ll explore the Ryobi Tile Saw, a trusted tool in the world of tiling, and guide you through its features, benefits, and usage to help you master the art of tile cutting.
Ryobi Tile Saw and its features:
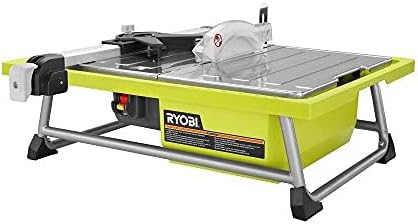
The Ryobi Tile Saw is a well-regarded tool known for its reliability and performance in the world of tile cutting. This tool is designed to provide both amateurs and professionals with the ability to achieve pristine cuts in a wide range of tile materials, including ceramic, porcelain, stone, and more. Some of its notable features include a powerful motor, water cooling system, and a variety of cutting accessories.
Whether you’re a seasoned pro or just starting your tiling journey, the Ryobi Tile Saw offers a user-friendly and efficient way to get the job done. With features like adjustable rip fence, miter guide, and a durable diamond blade, this saw is a valuable addition to your toolkit.
The primary purpose of this blog post is to provide a comprehensive guide to using the Ryobi Tile Saw effectively and safely. We aim to empower you with the knowledge and confidence to tackle tiling projects with precision, whether it’s a small bathroom renovation or a large-scale commercial installation. By the end of this post, you’ll have a clear understanding of how to operate your Ryobi Tile Saw, make various cuts, and maintain it for long-lasting performance. We’ll also share tips and tricks to help you achieve professional-looking results.
Throughout this post, we’ll cover the essential aspects of using the Ryobi Tile Saw, from understanding the different models and their specifications to mastering the art of tile cutting and maintenance. Our goal is to ensure that you can confidently and efficiently use your Ryobi Tile Saw, so your tiling projects are not only successful but also enjoyable. Whether you’re new to tiling or a seasoned pro, this guide is your key to unlocking the full potential of your Ryobi Tile Saw.
Understanding Your Ryobi Tile Saw
Overview of the different models and their specifications:
Ryobi WS722
This compact and affordable tile saw is perfect for small to medium-sized projects. It features a 7-inch blade and a 3/4 HP motor. Its cutting capacity can handle tiles up to 12 inches in size. The WS722 is lightweight and easy to transport, making it a popular choice for DIY enthusiasts.
Ryobi WS731

The WS731 is a step up from the WS722 and offers more power and versatility. It features a 7-inch blade and a 4.8 Amp motor. With a cutting capacity of 20 inches, it’s suitable for larger tiles and projects. The saw also includes a miter guide for making precision angle cuts.
Ryobi WS750L

This model is a top-of-the-line option for professionals and serious DIYers. It boasts a 7-inch diamond cutting wheel and a 4.8 Amp motor. With a cutting capacity of up to 24 inches, it can handle larger tiles with ease. The WS750L also comes with an integrated laser guide for highly accurate cuts.
Key features and benefits of the Ryobi Tile Saw:
- Water Cooling System: All Ryobi tile saws come equipped with a water reservoir and pump. This feature keeps the blade cool and minimizes dust during cutting, resulting in cleaner and smoother cuts.
- Adjustable Cutting Depth: Ryobi saws allow you to adjust the cutting depth, ensuring you can cut through different tile thicknesses with precision.
- Durable Construction: The saws are built with sturdy materials, making them durable and long-lasting for various tiling projects.
- Portability: Many Ryobi tile saws are designed with portability in mind. They are lightweight and often have carrying handles, making them easy to transport to different job sites.
- Miter Guide (on select models): For precise angle cuts, some Ryobi tile saws come with a miter guide that can be adjusted for various angles.
- Laser Guide (on select models): The integrated laser guide offers superior cutting accuracy, helping users achieve professional results.
Safety precautions and guidelines for usage:
- Safety Gear: Always wear appropriate safety gear, including safety glasses, hearing protection, and gloves when operating the tile saw.
- Electrical Safety: Ensure the tile saw is properly grounded and connected to a GFCI-protected outlet to prevent electrical hazards.
- Water Safety: Keep the water reservoir filled while using the saw to prevent overheating and reduce dust. Never allow the saw to run dry, as this can damage the blade.
- Blade Guard: Ensure the blade guard is in place and functioning properly to prevent accidental contact with the cutting blade.
- Secure Workpiece: Securely clamp or hold the tile in place to prevent movement during cutting, reducing the risk of accidents.
- Read the Manual: Familiarize yourself with the user manual and follow the manufacturer’s guidelines and safety instructions.
By providing detailed information about the different Ryobi tile saw models, their features, and safety guidelines, your readers will be better equipped to choose the right saw for their specific needs and use it safely and effectively.
Setting Up Your Ryobi Tile Saw
Choosing the right location and workspace:
When setting up your Ryobi Tile Saw, it’s essential to choose the right location and workspace to ensure safety and efficiency. Here are some key considerations:
- Indoor vs. Outdoor: Ryobi Tile Saws are designed for both indoor and outdoor use, but it’s essential to consider the specific project. For indoor projects, ensure proper ventilation and cover nearby surfaces to protect against splashes. For outdoor use, set up in a suitable area with stable ground.
- Flat and Level Surface: Place the tile saw on a flat and level surface to prevent wobbling during operation. Uneven surfaces can affect the accuracy of your cuts.
- Proximity to Power and Water: Position the tile saw within reach of a power source and a water supply. Ryobi Tile Saws use a water reservoir for cooling and dust control, so access to water is crucial.
- Adequate Lighting: Ensure good lighting in your workspace to accurately see your markings and the cutting path.
Assembling the saw and adjusting the water reservoir:
Assembling your Ryobi Tile Saw is a relatively straightforward process. Follow these steps:
- Unpacking and Inspection: Start by unpacking your tile saw and inspecting it for any visible damage. Make sure all components are included and in good condition.
- Assembly: Follow the manufacturer’s instructions to assemble the saw. This typically involves attaching the water reservoir, securing the cutting blade, and setting up any additional accessories.
- Adjusting the Water Reservoir: The water reservoir is an essential part of the tile saw as it cools the blade and reduces dust. Ensure that it’s properly filled with clean water. Some Ryobi Tile Saws have adjustable water flow settings, so you can control the amount of water used during cutting for different tile materials.
- Safety Checks: Before using the tile saw, double-check all connections and adjustments to ensure everything is secure and in working order.
Safety equipment and gear:
Safety should be a top priority when operating any power tool, including the Ryobi Tile Saw. Make sure you have the following safety equipment and gear on hand:
- Safety Glasses: Protect your eyes from flying debris and water splashes by wearing safety glasses with side shields.
- Hearing Protection: The tile saw can be noisy, so ear protection is advisable, especially for extended use.
- Dust Mask: To prevent inhaling dust generated during cutting, wear a dust mask or respirator.
- Gloves: Using gloves provides a better grip on tiles and protects your hands from potential sharp edges.
- Appropriate Clothing: Wear long sleeves, long pants, and closed-toe shoes to protect your skin from splashes and debris.
- Respiratory Protection: If cutting materials like stone or porcelain, consider a more robust respiratory mask that can filter out fine dust particles.
- First Aid Kit: Have a basic first aid kit nearby in case of minor injuries.
- Fire Extinguisher: While rare, it’s a good safety measure to have a fire extinguisher in the workspace, especially if working with flammable materials.
Remember that safety is paramount, and following these guidelines will help ensure a secure and successful tile cutting project with your Ryobi Tile Saw.
Preparing Your Tiles
Choosing the right type and size of tiles for your project:
The choice of tiles is a critical step in any tiling project. Here’s how to make the right selections:
- Tile Type: Consider the material of the tiles. Common choices include ceramic, porcelain, natural stone, and glass. Each has its own cutting requirements, so choose the type that best suits your project and aesthetics.
- Tile Size: The size of the tiles will determine the capacity of your Ryobi Tile Saw. Ensure that the saw’s table and blade can accommodate the size of tiles you plan to cut.
- Thickness: Tile thickness can vary, so make sure your saw’s blade is suitable for cutting through the thickness of your chosen tiles.
- Design and Style: Consider the pattern and design of the tiles, especially if you’re working on a complex layout. Plan how the cuts will fit into the overall design.
Measuring and marking tiles for cutting:
Precision is key when cutting tiles, and accurate measurements and markings are essential. Here’s how to do it:
- Measure Twice: Before making any cuts, measure the area where the tile will be placed. Double-check your measurements to avoid costly mistakes.
- Marking Tools: Use a pencil or a tile marker to mark the cutting lines on the tile’s surface. A straight edge or square can help ensure straight lines.
- Consider Tile Spacers: If you’re tiling a larger area, use tile spacers to maintain consistent gaps between tiles. This will affect your measurements and cuts.
- Cutting Lines: Clearly mark the lines where you’ll make your cuts. Take into account any notches or angles required for the specific project.
Sorting tiles and planning the layout:
Tile layout and organization are crucial to a successful tiling project:
- Dry Layout: Before cutting or adhering tiles, perform a dry layout by placing tiles on the surface without adhesive. This helps you visualize the final design and identify any potential issues.
- Pattern Planning: If you’re creating a pattern or mosaic, plan the layout carefully. Ensure that the cut tiles will fit seamlessly with the uncut ones.
- Tile Orientation: Decide on the orientation of the tiles. Consider the direction of the tile pattern and how the cuts will align.
- Tile Sorting: If you have multiple boxes of tiles, sort them to ensure consistent color and texture throughout your project.
- Cuts as Needed: Identify the tiles that require cutting and plan the cuts to minimize waste and achieve a clean, professional look.
Properly preparing your tiles and planning your layout will save you time and ensure a polished result when using your Ryobi Tile Saw.
Operating the Ryobi Tile Saw
How to Power On and Adjust the Saw:
- Powering On:
- Locate the power switch or button, typically found near the saw’s base or control panel.
- Ensure that the saw is plugged into a suitable power source and the power cord is in good condition.
- Press the power button to turn on the Ryobi Tile Saw.
- Adjusting the Blade Depth:
- Most Ryobi Tile Saws allow you to adjust the blade’s depth to control the depth of your tile cuts.
- This is typically done using a depth adjustment knob or lever.
- Loosen the adjustment mechanism, set the desired depth, and tighten it securely.
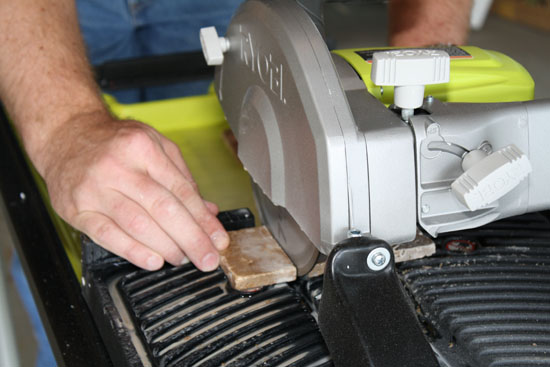
Techniques for Making Straight and Angled Cuts:
- Straight Cuts:
- Measure and mark the tile where you want to make a straight cut. Use a straightedge or a tile square for accuracy.
- Position the tile on the saw’s table with the marked line aligned with the blade’s path.
- Hold the tile securely, activate the saw, and gently feed the tile into the blade. Maintain a steady, even pace for a clean cut.
- Angled Cuts:
- Adjust the saw’s miter gauge to the desired angle if available.
- Mark the tile along the angle you want to cut.
- Position the tile on the saw table, aligning the marked line with the blade’s path and the miter gauge if in use.
- Carefully feed the tile into the blade while maintaining the desired angle. Practice on scrap pieces if you’re new to angled cuts.
Using Guides and Accessories for Precision Cutting:
- Rip Fence:
- The rip fence is a guide that helps you make straight, parallel cuts.
- Attach the rip fence to the saw’s table and adjust it to the desired width.
- Slide the tile along the rip fence for precise and consistent cuts.
- Miter Gauge:
- The miter gauge is essential for making angled cuts.
- Attach the miter gauge to the saw’s table and set it to the desired angle.
- Use the miter gauge to guide your tile during angled cuts.
- Water Reservoir and Pump:
- Ensure that the water reservoir is filled to an appropriate level to keep the blade cool and minimize dust.
- The water pump should be running to continually wet the blade during operation.
Safety and Maintenance
Safe Work Practices when Using the Ryobi Tile Saw:
- Wear Safety Gear:
- Always wear safety glasses, hearing protection, and a dust mask to protect your eyes, ears, and lungs.
- Use cut-resistant gloves to handle tiles.
- Positioning:
- Maintain a clear and well-lit workspace.
- Stand to the side of the blade and not in the direct path of any debris.
- Keep your hands and body away from the cutting area.
- Safety Switches:
- Familiarize yourself with the saw’s safety features, such as blade guards and emergency stop switches.
- Ensure these safety features are functioning properly before use.
Cleaning and Maintaining Your Saw for Optimal Performance:
- Cleaning:
- After each use, clean the saw by removing any tile fragments, slurry, and debris from the table and water reservoir.
- Wipe down the machine to prevent build-up that can affect its performance.
- Blade Care:
- Regularly inspect the blade for signs of wear or damage. Replace the blade if it’s worn or chipped.
- Lubricate any moving parts as recommended by the manufacturer.
- Water Management:
- Monitor and change the water in the reservoir as needed to keep the blade cool and prevent overheating.
Troubleshooting Common Issues:
- Uneven Cuts:
- Check the blade for damage or dullness. Replace if necessary.
- Ensure the tile is properly secured and the guide or fence is aligned correctly.
- Overheating or Blade Slippage:
- Check the water reservoir for an adequate water supply and make sure the blade is properly lubricated.
- Motor Issues:
- If the saw’s motor is not working correctly, consult the user manual for troubleshooting steps or contact the manufacturer’s support.
By following these operating, safety, and maintenance guidelines, you can achieve precise cuts with your Ryobi Tile Saw and extend its lifespan while keeping yourself safe during the process.
Tips and Tricks for Professional-Looking Results
Cutting Intricate Shapes and Patterns:
Achieving professional-looking results often involves cutting intricate shapes and patterns in tiles, and the Ryobi Tile Saw can handle these tasks with finesse. To cut intricate shapes, you should start by carefully marking the shape on the tile using a pencil or a marker. Then, slowly and steadily guide the tile through the blade, making precise adjustments as needed. For more complex patterns, it’s a good idea to practice on spare tiles before tackling your main project. The Ryobi Tile Saw’s precise cutting capabilities it easier to create curves, notches, and other intricate designs. Using a tile nipper for small adjustments and a file for smoothing rough edges can also help you achieve precise results. Remember to take your time and prioritize accuracy, and you’ll be able to cut even the most intricate shapes with confidence.
Handling Different Tile Materials (Ceramic, Porcelain, Glass, etc.):
One of the remarkable features of the Ryobi Tile Saw is its versatility when it comes to handling various tile materials, including ceramic, porcelain, and glass. Each type of tile has its own unique characteristics, and you should adjust your cutting technique accordingly. For ceramic tiles, the Ryobi Tile Saw’s standard blade should work well. However, for porcelain and glass, it’s recommended to use a specialized blade designed for these materials to minimize chipping and breakage. When working with glass tiles, ensure they are properly lubricated to reduce friction and the risk of shattering. Additionally, adjusting the water flow to provide adequate cooling and lubrication for the blade is crucial when cutting harder materials like porcelain. The key to success is selecting the right blade for the job, maintaining proper water flow, and working with a steady hand to produce clean and precise cuts in different tile materials.
Minimizing Chipping and Ensuring Clean Edges:
Chipping is a common concern when cutting tiles, but with the Ryobi Tile Saw, you can minimize it and ensure clean edges by following a few essential guidelines. First and foremost, ensure you’re using a sharp and well-maintained blade. A dull blade is more likely to cause chipping, so replace it as needed. Secondly, mark your cut lines clearly, and consider placing masking tape over the cutting area to reduce splintering. When cutting, go slowly and steadily, allowing the blade to do the work without forcing the tile through. Additionally, cutting tiles with the finished side facing up can help reduce chipping on the surface that will be visible in your project. Finally, consider using a wet saw for particularly challenging cuts, as the water lubrication helps minimize chipping and keeps the blade and tile cool. By adhering to these tips, you can ensure your tile edges are clean and professional-looking, enhancing the overall quality of your tiling project.
Conclusion
Mastering the art of tile cutting with the Ryobi Tile Saw opens up a world of possibilities for both DIY enthusiasts and professional tile setters. This comprehensive guide has walked you through the fundamentals of using your Ryobi Tile Saw, from setup to operation, all while emphasizing safety and precision. We’ve delved into the art of cutting intricate shapes and patterns, showing you that with the right techniques and a bit of practice, you can tackle even the most complex tiling designs with confidence. Handling different tile materials, such as ceramic, porcelain, and glass, was demystified, with the emphasis on selecting the appropriate blade, maintaining water flow, and adhering to the right cutting techniques for each material. And when it comes to achieving clean edges and minimizing chipping, we’ve provided you with the best practices, from maintaining a sharp blade to using masking tape and maintaining a steady hand. With the Ryobi Tile Saw as your trusty tool, your tiling projects can achieve a level of professionalism that was once reserved for experts. So, go forth and explore your creative tiling endeavors, and don’t hesitate to reach out for support or share your own experiences.
Happy tiling!