
Importance of Selecting the Right Sandpaper Grit
Selecting the right sandpaper grit is a fundamental aspect of any sanding project, whether you’re a seasoned woodworker, a DIY enthusiast, or just someone tackling a simple home improvement task. The grit you choose has a significant impact on the efficiency and quality of your work. Think of sandpaper grit as the key that unlocks the door to a smooth, polished finish. Choosing the appropriate grit can save you time, effort, and frustration while helping you achieve the professional results you desire.
The choice of sandpaper grit is not a mere technicality; it’s a decision that directly influences your project’s success. Selecting the wrong grit can lead to excessive material removal, leaving uneven surfaces, or even damaging your workpiece. On the other hand, choosing the right grit enables you to work efficiently, producing a surface that’s ready for painting, staining, or finishing. It’s the difference between a flawless, professional-looking finish and a project riddled with imperfections. In this guide, we’ll delve into the intricacies of sandpaper grit, helping you understand what it is, how it’s measured, and how to select the perfect grit for your specific tasks. With this knowledge, you’ll be well-equipped to transform your projects and achieve remarkable outcomes.
Understanding Sandpaper Grit
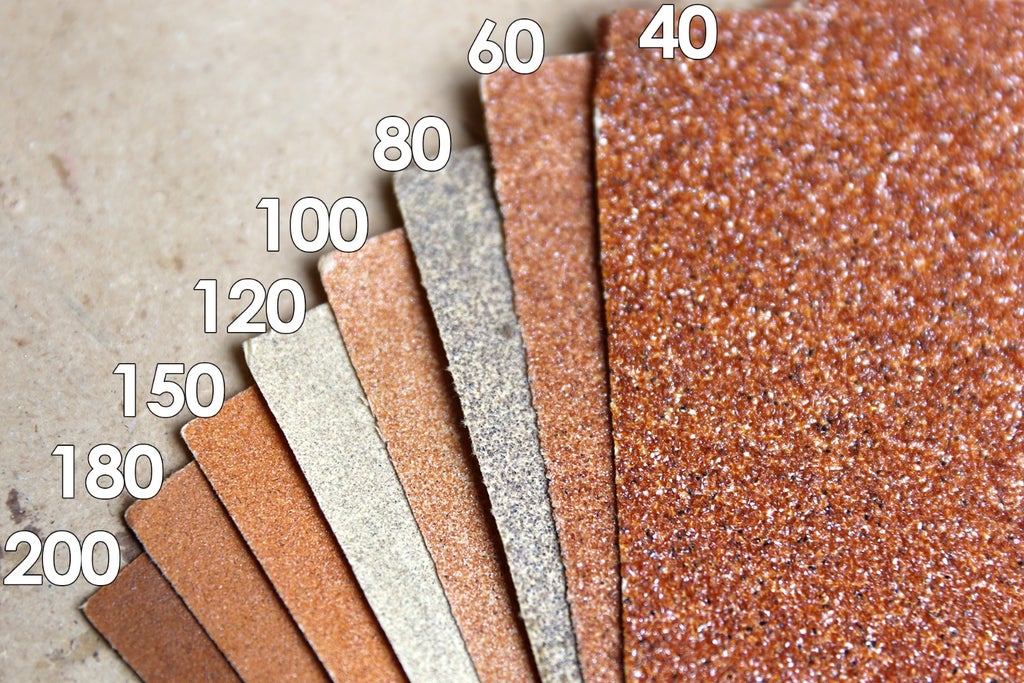
Sandpaper grit refers to the coarseness or fineness of the abrasive particles embedded on its surface. It is a critical factor in determining how much material the sandpaper can remove and the type of surface finish it can achieve. Grit is measured by the number of abrasive particles per square inch on the sandpaper. The higher the grit number, the finer and less abrasive the sandpaper. Conversely, lower grit numbers represent coarser sandpaper with larger abrasive particles. For example, 40-grit sandpaper has larger, more abrasive particles and is considered coarse, whereas 220-grit sandpaper has finer particles and is classified as a fine grit. Understanding the grit number is essential because it allows you to choose the right sandpaper for your specific needs, ensuring that you don’t over- or under-sand your material.
Relationship between sandpaper grit number and abrasiveness
The grit number on sandpaper is inversely related to its abrasiveness. In other words, lower grit numbers (e.g., 40 or 60) indicate coarser, more abrasive sandpaper, while higher grit numbers (e.g., 220 or 320) signify finer, less abrasive sandpaper. Coarser grits are ideal for tasks that require heavy material removal, such as stripping paint or leveling a rough surface. They are more aggressive and can quickly smooth out imperfections. On the contrary, finer grits are suitable for finishing and polishing, leaving a smoother and more refined surface. By understanding this relationship, you can make informed decisions about which grit to use for a given project, ensuring that your sandpaper aligns with your goals and leads to a successful outcome.
Types of Sandpaper Grit
When it comes to sandpaper, a variety of grits are available to cater to different needs and stages of your project. Understanding the characteristics and applications of the four main categories of sandpaper grits—coarse, medium, fine, and extra fine—will help you make informed decisions on which to use. Let’s delve into each category:
1. Coarse Grits (40-60):
- Grit Number Range: Coarse grit sandpapers typically range from 40 to 60.
- Characteristics: Coarse grits have large, abrasive particles that make them highly effective for material removal. They are the most aggressive of the sandpaper grits, capable of quickly leveling surfaces and removing stubborn imperfections such as old paint, rust, or deep scratches.
- Applications:
- Initial surface preparation for a smoother finish.
- Shaping wood, metal, or other materials that require significant material removal.
- Use with caution, as excessive pressure can lead to over-sanding or damage to the workpiece.
2. Medium Grits (80-120):
- Grit Number Range: Medium grit sandpapers typically range from 80 to 120.
- Characteristics: Medium grits strike a balance between aggressiveness and smoothness. They feature smaller abrasive particles that provide a moderate level of material removal.
- Applications:
- General sanding tasks, including leveling surfaces.
- Preparing surfaces for a finer finish.
- Smoothing surfaces after initial coarse sanding.
- Shaping wood and metal.
3. Fine Grits (150-220):
- Grit Number Range: Fine grit sandpapers typically range from 150 to 220.
- Characteristics: Fine grits have even smaller abrasive particles, providing a smoother and less aggressive sanding action. They are excellent for achieving a polished surface and preparing for finishes like paint or varnish.
- Applications:
- Sanding between coats of paint or finish to create a smooth base.
- Preparing surfaces for a final finish.
- Achieving a silky, polished texture on wood.
- Removing minor imperfections left by medium and coarse grits.
4. Extra Fine Grits (240 and above):
- Grit Number Range: Extra fine grit sandpapers typically start at 240 and go above.
- Characteristics: Extra fine grits contain the smallest abrasive particles, making them ideal for the final stages of finishing and polishing.
- Applications:
- Achieving a mirror-like finish on wood, metal, or automotive surfaces.
- Preparing surfaces for staining or clear coats.
- Fine-tuning and polishing to eliminate imperfections.
Understanding the distinctions between these sandpaper grit categories is vital to selecting the right grit for your project. The choice of grit significantly influences the efficiency of material removal, the smoothness of your workpiece, and the quality of the final finish. When starting a project, always begin with the appropriate coarse grit for the material’s condition and progress through medium, fine, and extra fine grits as needed to achieve your desired result.

Comparison Chart of Sandpaper Grit
Here’s a table summarizing the four main categories of sandpaper grits, including their grit number ranges and characteristics:
| Sandpaper Grit Category | Grit Number Range | Characteristics | Common Applications |
|---|---|---|---|
| Coarse Grits | 40-60 | – Large abrasive particles | – Initial surface preparation for a smoother finish |
| – Highly effective for material removal | – Shaping wood, metal, or materials with imperfections | ||
| – Aggressive, quickly levels surfaces | – Removing old paint, rust, or deep scratches | ||
| Medium Grits | 80-120 | – Moderate material removal | – General sanding tasks and leveling surfaces |
| – Balanced between aggressiveness and smoothness | – Preparing surfaces for a finer finish | ||
| – Smoother than coarse grits, ideal for smoothing | – Shaping wood and metal | ||
| Fine Grits | 150-220 | – Smaller abrasive particles for smoother sanding | – Sanding between coats of paint or finish |
| – Preparation for a final finish | – Achieving a polished, silky texture on wood | ||
| – Removal of minor imperfections left by coarser grits | |||
| Extra Fine Grits | 240 and above | – Smallest abrasive particles for ultra-smooth finish | – Achieving a mirror-like finish on wood, metal, or automotive surfaces |
| – Ideal for polishing and fine-tuning | – Preparing surfaces for staining or clear coats | ||
| – Perfect for eliminating imperfections |
This table provides a clear overview of the grit categories, their grit number ranges, characteristics, and common applications, making it easier to select the appropriate sandpaper grit for your specific project.
Material and Condition Considerations
Explaining How the Condition of the Material Affects Sandpaper Grit Selection:
The condition of the material you are working on is a critical factor in determining the appropriate sandpaper grit. Different materials, whether wood, metal, or other surfaces, may be in various states—rough, uneven, or smooth. Let’s delve into how the material’s condition influences your grit choice:
- Rough Surfaces:
- When dealing with rough or uneven surfaces, such as raw wood with visible imperfections or a weathered piece of furniture, start with a coarse grit (typically 40-60). Coarse grits are designed to remove material quickly, making them ideal for leveling and smoothing rough surfaces efficiently.
- The coarse grit will help you eliminate prominent defects and prepare the material for finer sanding stages. Once the roughness is diminished, you can transition to a medium grit for further smoothing.
- Uneven Surfaces:
- Materials with an uneven texture, like plywood with visible seams or hardwood with variations in grain depth, require special attention. In such cases, begin with a medium grit (around 80-120). Medium grits can level the surface without removing too much material, making them suitable for these situations.
- Sanding with a medium grit will help you create a uniform, flat surface while preserving the material’s integrity. If there are still minor imperfections, you can move to finer grits in subsequent stages.
- Smooth Surfaces:
- Smooth surfaces, like a well-prepared wood project or a piece of metal with minimal imperfections, call for finer grits. Starting with a fine grit (150-220) or extra fine grit (240 and above) is recommended for achieving a polished finish.
- Fine grits are perfect for eliminating minor blemishes, scratches, or roughness on smooth surfaces. They provide the precision and finesse required for a refined outcome.
Project Goals and Desired Finish
Emphasizing the Importance of Aligning Sandpaper Grit Choice with Project Goals:
Selecting the right sandpaper grit isn’t just about the material; it’s also closely tied to your project goals and the desired finish you want to achieve. Here’s why aligning your grit choice with your project goals is crucial:
- Efficiency and Speed:
- If your project’s primary goal is efficiency and you don’t necessarily need a perfect finish, you can opt for coarser grits. These remove material quickly, saving you time and effort. For instance, when sanding a deck, you might prioritize efficiency over a glass-smooth surface.
- Surface Quality and Aesthetics:
- When aesthetics and surface quality are paramount, it’s essential to choose the finest grit that aligns with your project. Finer grits provide a smoother, more polished appearance. This is crucial for projects like fine woodworking or furniture refinishing, where a flawless finish is the goal.
- Coating and Paint Adhesion:
- If your project involves applying coatings or paint, the choice of grit plays a vital role. Smoother surfaces achieved with finer grits ensure better adhesion and a more even coat of paint or finish, resulting in a professional-looking outcome.
Discussing How the Desired Finish Dictates Sandpaper Grit Selection:
The desired finish is a key factor in choosing the right grit:
- Rough Finish: If you want a textured, rustic finish, you may deliberately choose coarser grits to leave some visible grain and imperfections on the surface.
- Smooth Finish: For a sleek, smooth finish, finer grits are your best bet. They create an even, polished surface suitable for staining, varnishing, or applying a clear coat.
- Mirror-Like Finish: Achieving a mirror-like finish, such as on fine furniture or automotive surfaces, necessitates extra fine grits to eliminate all imperfections and create a flawless shine.
By aligning your grit selection with your project goals and desired finish, you ensure that your sanding efforts result in the precise outcome you envisioned. Careful consideration of both the material’s condition and your project objectives will lead to a successful and satisfying finish.

Practical Applications
Understanding the practical applications of different sandpaper grits is essential for achieving professional results in your projects. Here, we’ll provide real-world examples and use cases for each grit type and explain when to switch between grits during a project.
Coarse Grits (40-60):
- Real-world examples:
- Stripping old paint or varnish from wooden furniture.
- Removing rust and corrosion from metal surfaces.
- When to switch:
- Start with coarse grit to remove the majority of the material quickly.
- Switch to a finer grit as you approach the desired surface quality.
Medium Grits (80-120):
- Real-world examples:
- Smoothing rough wood surfaces for refinishing.
- Preparing drywall for painting or repairs.
- When to switch:
- Use medium grit for general sanding tasks.
- Transition to a finer grit for a smoother finish or to address visible scratches.
Fine Grits (150-220):
- Real-world examples:
- Sanding between coats of paint or varnish for a flawless finish.
- Preparing wood surfaces for staining or finishing.
- When to switch:
- Employ fine grits for fine finishing and to eliminate imperfections.
- Transition to an extra fine grit for a polished, refined look.
Extra Fine Grits (240 and above):
- Real-world examples:
- Achieving a mirror-like finish on wooden furniture or instruments.
- Polishing metal surfaces to a high shine.
- When to switch:
- Use extra fine grits in the final stages of finishing.
- Continue using even finer grits for the finest, most delicate work.
Grit Selection for Specific Projects
Now, let’s dive into specific project recommendations for choosing the right sandpaper grit based on the task at hand:
1. Removing Paint:
- Start with a coarse grit (40-60) to remove the bulk of the paint quickly.
- Transition to medium grit (80-120) for smoothing and leveling the surface.
- Finish with fine grit (150-220) for a paint-ready, smooth surface.
2. Finishing Wood:
- Begin with medium grit (80-120) to eliminate roughness and irregularities.
- Progress to fine grit (150-220) for a smooth and even surface.
- Use extra fine grit (240 and above) for a flawless finish before staining or applying a finish.
3. Polishing Metal:
- For removing rust or corrosion, start with a coarse grit (40-60).
- Transition to medium grit (80-120) for refining the surface.
- Polish to a high shine using extra fine grit (240 and above) for a mirror-like finish.
4. Smoothing Drywall:
- Begin with medium grit (80-120) to even out and feather the joint compound.
- Progress to fine grit (150-220) for a smooth, paintable surface.
- Use a finer grit for the final sanding between paint coats.
5. Restoring Furniture:
- Start with a coarse grit (40-60) for stripping old finishes or paint.
- Move to medium grit (80-120) for shaping and smoothing the wood.
- Finish with fine and extra fine grits (150-220 and 240+) for a beautiful, refined appearance.
By applying these specific grit recommendations to your projects, you’ll ensure that your sanding efforts are efficient, effective, and yield the desired results. Always remember to switch grits when necessary to achieve a polished and professional finish.
Conclusion
The choice of the right sandpaper grit is a critical determinant of the quality and success of your woodworking and DIY projects. By understanding the characteristics and practical applications of various grit types, you can elevate your craftsmanship to professional levels. Coarse grits swiftly remove material, while medium grits prepare surfaces, fine grits provide a smooth foundation, and extra fine grits deliver impeccable finishes. Switching between grits at the appropriate junctures is essential for achieving optimal results. Whether you’re removing paint, finishing wood, polishing metal, smoothing drywall, or restoring furniture, the proper grit selection ensures that your projects are not only efficient but also yield the polished and flawless outcomes you desire. Armed with this knowledge, you can approach your projects with confidence and take your DIY and woodworking endeavors to the next level.