
Mastering the Art of Roofing: Unveiling the Roofing Hammer
Roofing is a fundamental component of any construction project, serving as a protective shield against the elements and ensuring the structural integrity of a building. In this intricate process, the role of specialized tools cannot be overstated. Among these, the roofing hammer stands as a cornerstone, embodying the synergy of precision and power required for a successful roofing endeavor.
The Crucial Role of Roofing Tools
Roofing tools form the bedrock of any roofing project, acting as the extension of a craftsman’s expertise and skill. From measuring and cutting to fastening and sealing, each tool plays an integral role in the process. They are the instruments that bridge the gap between concept and construction, enabling roofing professionals to translate their vision into a tangible, weather-resistant reality.
Without the right tools at hand, even the most skilled craftsman would find their efforts compromised. Precision and accuracy, hallmarks of quality craftsmanship, are contingent upon the tools used. Therefore, investing in high-quality roofing tools is not only a practical necessity but a testament to a commitment to excellence in every project undertaken.
Significance of the Roofing Hammer
Among the arsenal of roofing tools, the roofing hammer holds a position of paramount importance. Its multifaceted design and purpose render it indispensable in various stages of roofing, from the initial installation to repairs and maintenance. The roofing hammer embodies the fusion of strength and finesse, combining the power to drive nails with the precision required to secure roofing materials securely.
The unique features of a roofing hammer, including its specialized head and ergonomic handle, are expressly tailored to the demands of roofing applications. Its claw, adept at extracting nails, is as vital as its face, engineered to provide a firm and controlled strike. In the hands of a skilled professional, the roofing hammer is an extension of expertise, ensuring each nail is driven with exacting precision, contributing to the longevity and durability of the roof.
The purpose of this blog post is to provide an in-depth exploration of the roofing hammer, from its essential components to its varied applications. Through comprehensive analysis and practical insights, readers will gain a thorough understanding of the significance of this indispensable tool in the realm of roofing. The structure of this post is meticulously designed to facilitate a holistic comprehension, covering topics ranging from the anatomy of a roofing hammer to techniques for efficient use, and culminating in a discussion on emerging trends and innovations in roofing hammer technology. By the conclusion of this blog post, readers will be equipped with the knowledge necessary to make informed decisions regarding the selection and utilization of roofing hammers in their roofing endeavors.
Our Top Picks for Roofing Hammer
1. Estwing 20-oz E3-16S Roofing Hammer

The Estwing 20-oz E3-16S Roofing Hammer is a popular choice for professional roofers. It is made of high-quality forged steel and has a durable powder-coat finish. The hammer features a curved claw for easy nail pulling and a sharp pick for cutting shingles.
2. Vaughan 18-oz VRH18 Roofing Hatchet

The Vaughan 18-oz VRH18 Roofing Hatchet is another popular choice for professional roofers. It is made of high-quality forged steel and has a durable powder-coat finish. The hammer features a curved claw for easy nail pulling and a sharp pick for cutting shingles. It also has a magnetic nail holder for convenience.
3. Stanley FatMax 20-oz 51-893 Roofing Hammer

The Stanley FatMax 20-oz 51-893 Roofing Hammer is a good choice for both professional and DIY roofers. It is made of high-quality forged steel and has a durable powder-coat finish. The hammer features a curved claw for easy nail pulling and a sharp pick for cutting shingles. It also has a magnetic nail holder for convenience.
4. Irwin 16-oz Marples Roofing Hammer
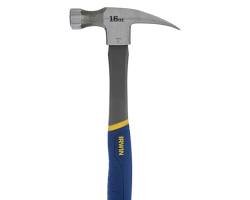
The Irwin 16-oz Marples Roofing Hammer is a good choice for DIY roofers. It is made of high-quality forged steel and has a durable powder-coat finish. The hammer features a curved claw for easy nail pulling and a sharp pick for cutting shingles.
5. Stanley 16-oz 51-166 Roofing Hammer
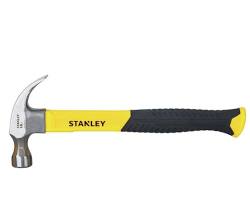
The Stanley 16-oz 51-166 Roofing Hammer is another good choice for DIY roofers. It is made of high-quality forged steel and has a durable powder-coat finish. The hammer features a curved claw for easy nail pulling and a sharp pick for cutting shingles. It also has a magnetic nail holder for convenience.
Anatomy of a Roofing Hammer
Head
The head of a roofing hammer is a critical component that determines its functionality and effectiveness in roofing tasks. It is typically constructed from durable materials, such as steel alloys, to withstand the demands of roofing work.
- Face: The face of a roofing hammer is the striking surface that comes into direct contact with the roofing material. It is usually flat, providing a broad and even surface area for driving nails. Some advanced roofing hammers may have a textured or serrated face to provide additional grip and prevent slippage when striking nails, especially in adverse weather conditions.
- Claw: The claw is the opposite end of the face and serves the purpose of removing nails from surfaces. It is designed with a curved or V-shaped notch that allows it to grip and extract nails effectively. The claw’s shape and curvature are crucial in ensuring a secure grip on the nail head, minimizing the risk of slippage or damage to the roofing material.
Handle
The handle of a roofing hammer plays a pivotal role in providing control, comfort, and stability during operation. It is the part of the hammer that the user holds and manipulates.
- Material: Roofing hammer handles are commonly made from various materials, including wood, fiberglass, and steel. Each material offers distinct advantages. Wood handles provide a natural feel and absorb shock well, while fiberglass handles are lightweight and resistant to weathering. Steel handles offer exceptional durability and longevity.
- Grip: The grip of a roofing hammer is the portion of the handle that the user holds. It is typically contoured or textured to provide a secure and comfortable grip. Some handles may have ergonomic features or rubberized coatings to reduce hand fatigue and increase control during extended use.
- Length and Design: The length of the handle is a crucial factor in determining the leverage and striking power of the roofing hammer. Longer handles provide greater leverage but may sacrifice maneuverability in tight spaces. The design of the handle, including its shape and curvature, should complement the user’s hand size and grip strength, ensuring optimal control and accuracy.
Weight and Balance
The weight and balance of a roofing hammer are key considerations for both comfort and effectiveness during use.
The weight of the roofing hammer should be balanced to allow for controlled and precise strikes. A well-balanced hammer reduces user fatigue and helps maintain accuracy in nail placement.
Roofing hammers come in a range of weights, typically between 16 and 32 ounces. The choice of weight depends on the user’s preference, strength, and the specific roofing material being worked on. Heavier hammers provide more driving force, while lighter ones offer increased control and maneuverability.
Understanding the anatomy of a roofing hammer, including its head, handle, weight, and balance, is essential in selecting the right tool for the job. Each component contributes to the overall performance and usability of the hammer, ensuring that roofing tasks are carried out efficiently and with precision.
Types of Roofing Hammers
Traditional Roofing Hammer
A traditional roofing hammer is a time-tested tool that has been a staple in the arsenal of roofers for generations. Its design is characterized by a dual-faced head, typically featuring a smooth face for driving nails and a claw for extracting them. The head is forged from high-quality steel to ensure durability and longevity, while the handle is crafted from sturdy wood, providing a comfortable and reliable grip.
1. Features and Characteristics:
i. Dual-Faced Head:
The dual-faced head of a traditional roofing hammer is its defining feature. One face is smooth, allowing for precise and controlled nail driving, while the other face is equipped with a claw for effortless nail removal.
ii. Wooden Handle:
The handle of a traditional roofing hammer is traditionally made of wood, chosen for its ergonomic properties and ability to absorb shock during use. This feature contributes to reduced hand fatigue during prolonged work sessions.
iii. Weight and Balance:
These hammers are designed with careful attention to weight distribution, ensuring a balanced feel in the hand. This balance allows for efficient swinging and precise control.
2. Best Applications:
i. Asphalt Shingles:
Traditional roofing hammers excel in the installation of asphalt shingles, providing the necessary precision for securing them in place without damaging the material.
ii. General Roofing Repairs:
They are also well-suited for various roofing repairs, including re-nailing loose shingles and fastening flashing.
Roofing Hatchet
The roofing hatchet is a specialized tool designed with a compact, hatchet-like head and a short handle. This design provides roofers with a high degree of control and accuracy in confined spaces or when working on intricate roofing details.
1. Design and Functionality:
i. Hatchet-Like Head:
The head of the roofing hatchet is reminiscent of a small hatchet, with a sharply angled face for precise nail placement and a claw for efficient nail removal.
ii. Short Handle:
Unlike traditional roofing hammers, the roofing hatchet features a shorter handle, allowing for better maneuverability and control in tight spaces or when working on steep slopes.
iii. Lightweight Construction:
Roofing hatchets are typically lighter than their traditional counterparts, enhancing agility and reducing user fatigue.
2. Ideal Use Cases:
i. Cedar Shake Shingles:
Roofing hatchets are particularly effective for the installation of delicate materials like cedar shake shingles, where precision and control are paramount.
ii. Detail Work and Trim:
They excel in tasks that require finesse, such as installing flashing, trim, or other intricate roofing components.
All-Steel Roofing Hammer
The all-steel roofing hammer represents a modern evolution of roofing tools, featuring a head and handle crafted entirely from high-strength steel. This design offers increased durability and resilience against harsh weather conditions.
1. Composition and Advantages:
i. Full Steel Construction:
Both the head and handle of the all-steel roofing hammer are constructed from premium-grade steel, providing unmatched strength and longevity.
ii. Corrosion Resistance:
The steel composition ensures resistance to rust and corrosion, making it an ideal choice for outdoor use in various climates.
iii. Shock Absorption:
While entirely steel, advanced manufacturing techniques allow for effective shock absorption, reducing strain on the user’s hands and arms.
2. Recommended Applications:
i. Metal Roofing:
All-steel roofing hammers are particularly well-suited for the installation of metal roofing materials, where durability and corrosion resistance are crucial.
ii. Heavy-Duty Roofing Projects:
Their robust construction makes them an excellent choice for heavy-duty roofing applications, providing reliable performance under demanding conditions.
Understanding the distinct features and applications of these types of roofing hammers empowers professionals and DIY enthusiasts to select the tool best suited for their specific roofing projects. Whether opting for the time-honored traditional hammer, the precision-oriented roofing hatchet, or the modern all-steel variant, each serves as an indispensable asset in achieving quality roofing results.
Choosing the Right Roofing Hammer
Consideration Factors
- Roofing Material: Selecting the appropriate roofing hammer begins with a thorough understanding of the material you’ll be working with. Different roofing materials have distinct properties that influence the type of hammer needed for optimal results. For instance, asphalt shingles, a common roofing material, require a hammer with a broad, flat face to ensure even and secure fastening. Conversely, metal roofing necessitates a hammer that can deliver precision strikes without damaging the material’s surface. Wood shingles and shakes, on the other hand, may benefit from a roofing hatchet, which provides better control when driving nails into thicker materials.
- Personal Preference: Personal preference plays a pivotal role in the selection process. Some roofers may have a preference for a specific type or brand of hammer based on their past experiences and comfort levels. Factors such as the grip, weight, and overall feel of the hammer can greatly impact a roofer’s efficiency and accuracy. It is recommended to physically handle different hammers to determine which one aligns best with one’s personal comfort and working style.
- Project Scope and Scale:The scale and scope of the roofing project should also inform the choice of a roofing hammer. Larger projects, such as commercial or multi-unit residential roofing, may benefit from a hammer with a longer handle to provide additional leverage and reduce strain on the user. Conversely, smaller, more intricate projects may call for a compact and maneuverable hammer for precise nail placement.
Practical Tips for Selection
- Seek Professional Advice: Consulting with experienced roofing professionals or suppliers can provide valuable insights into which hammer is best suited for specific applications. They can offer recommendations based on the type of roofing work being undertaken.
- Test and Compare: Whenever possible, physically handle different hammers to get a feel for their weight, balance, and grip. Pay attention to how comfortable and controlled the hammer feels in your hand.
- Consider Ergonomics: Look for hammers with ergonomic features, such as cushioned grips and balanced weight distribution. These elements contribute to reduced hand fatigue and enhanced user comfort during extended use.
- Balance Cost and Quality: While it’s important to stay within budget constraints, investing in a high-quality roofing hammer is a long-term investment in efficiency and safety. Balancing cost with durability and functionality is key.
- Research Brand and Model Reputation: Read reviews, seek recommendations, and research the reputation of specific hammer models and brands. This can provide valuable insights into the performance and longevity of the tool.
By taking these considerations into account, roofers can make an informed decision when selecting a roofing hammer that aligns with the specific requirements of their project and personal preferences. This thoughtful approach ultimately contributes to a smoother, more efficient roofing process.
Techniques for Efficient Roofing Hammer Use
Proper Grip and Stance
Achieving precision and efficiency in roofing work begins with a correct grip and stance when wielding a roofing hammer. Here are essential considerations for mastering this crucial aspect:
Grip:
- Firmness and Control: Hold the hammer with a firm but not overly tight grip. This allows for control while preventing excessive strain on your hand and wrist.
- Placement: Position your hand towards the end of the handle for better leverage. Ensure your fingers are wrapped around the handle snugly.
Stance:
- Steady Foundation: Stand with your feet shoulder-width apart to provide a stable base. This foundation helps maintain balance and control while working at different angles on the roof.
- Positioning: Position yourself in such a way that your dominant hand is free to swing the hammer comfortably, and your non-dominant hand guides the nail into place.
Body Alignment:
- Face Your Work: Ensure your body is facing the area where you’re working. This minimizes the need for awkward twists and turns, reducing the risk of strain or injury.
Nailing Techniques
The art of using a roofing hammer lies in efficient nailing techniques. Proper nailing ensures that the roofing material is secure and the roof’s integrity is maintained:
Aim and Precision:
- Focus on Target: Direct your gaze towards the spot where you intend to drive the nail. Visual alignment aids in accuracy.
Controlled Swing:
- Consistent Force: Apply controlled force in each swing. This prevents overstrikes that may damage the roofing material or create weak points.
Utilize the Claw:
- Practical Leverage: The claw of the hammer can be used to adjust the position of nails or even to remove them if necessary. Mastering this technique can save time and effort.
Proper Depth:
- Avoid Under-Driving: Ensure that the nail is driven in fully, but without excessive force. Under-driven nails can lead to loose roofing material, while over-driven nails may cause damage.
Handling Different Roofing Materials
Different roofing materials require specific techniques to ensure a secure and long-lasting installation:
Asphalt Shingles:
- Angle of Approach: Position the nail at a slight angle to penetrate through the shingle without damaging it. This promotes a snug fit.
Wood Shakes or Shingles:
- Pilot Holes: For hardwoods, consider pre-drilling pilot holes to prevent splitting. Use galvanized or stainless-steel nails for rust resistance.
Metal Roofing:
- Clamping Technique: Use a specialized clamping technique to secure metal roofing panels. This prevents distortion or damage to the material.
Slate or Tile:
- Expertise Required: Installation of these materials demands precision and experience. Ensure that nails are placed in predetermined holes or slots for secure attachment.
By honing these techniques, you not only ensure a professional finish to your roofing projects but also extend the lifespan of the roof itself. Remember, practice and patience are key to becoming proficient in these essential skills.
Maintenance and Care of Roofing Hammers
Cleaning and Rust Prevention
Maintaining a roofing hammer in pristine condition is pivotal for its longevity and effectiveness on the job. Regular cleaning is an essential step in preventing rust and corrosion, which can compromise the integrity of the tool over time.
1. Cleaning Process:
- Begin by removing any debris or dirt from the hammer’s head using a stiff brush or wire bristle brush. Pay close attention to the crevices and corners where dirt tends to accumulate.
- Use a cloth or sponge dampened with a mild soapy solution to wipe down the entire surface of the hammer.
- Rinse thoroughly with clean water to remove any soap residue.
- Ensure the hammer is completely dry before storing it.
2. Rust Prevention:
- Apply a thin coat of rust-preventative spray or oil to the head of the hammer. This protective barrier will inhibit the formation of rust, especially in humid or damp environments.
- Store the hammer in a dry area, away from moisture and direct exposure to the elements.
Handle Inspection and Replacement
The handle of a roofing hammer is subjected to significant stress during use, making regular inspections crucial for safety and efficiency.
1. Check for Cracks or Splinters:
- Examine the entire length of the handle for any signs of cracks, splinters, or other damage. Even small imperfections can compromise the handle’s integrity.
2. Inspect the Grip:
- Ensure that the grip is secure and free from any looseness. A stable grip is essential for accurate strikes.
3. Evaluate Handle Flex:
- Gently flex the handle to check for excessive movement. If there is noticeable give or flexibility, it may be an indication that the handle is weakening.
4. Replacement Guidelines:
- If any significant damage or wear is detected, it is recommended to replace the handle promptly. Using a hammer with a compromised handle can lead to accidents or reduced effectiveness.
Head Maintenance and Sharpness
Maintaining the head of the roofing hammer ensures that it remains in optimal condition for precise and effective strikes.
1. Inspect the Face:
- Check the face of the hammer for signs of wear or damage. If the face is dented or chipped, it can affect the quality of your strikes.
2. Reshaping and Sharpening:
- If necessary, use a file to reshape and sharpen the face of the hammer. Ensure that it retains a smooth and flat surface for consistent contact with roofing materials.
3. Balancing:
- Ensure that the weight distribution between the head and handle is even. Imbalances can lead to inefficient strikes and unnecessary strain on the user.
By diligently adhering to these maintenance practices, roofing professionals can maximize the lifespan and performance of their roofing hammers, ultimately contributing to safer and more efficient roofing projects.
Conclusion
In the realm of roofing, precision and efficiency are paramount. The choice of tools plays a pivotal role in achieving excellence in every project. Amongst the arsenal of roofing instruments, the roofing hammer stands as a linchpin, offering a blend of craftsmanship, functionality, and reliability.
A well-selected roofing hammer is more than a mere tool; it becomes an extension of the roofer’s expertise and a testament to their commitment to quality workmanship. By choosing the right hammer, one can significantly enhance the overall roofing experience, leading to superior outcomes and client satisfaction.
The anatomy of a roofing hammer, including its head and handle design, balance, and weight, all contribute to its usability. Understanding these elements allows for a tailored selection based on individual preferences and the specific requirements of the project at hand.
Selecting the appropriate type of roofing hammer is equally critical. Traditional roofing hammers, roofing hatchets, and all-steel roofing hammers each have their unique features and are suited to distinct applications. By comprehending these distinctions, roofers can ensure that their chosen tool aligns seamlessly with the demands of the job.
Mastering the techniques of using a roofing hammer is an art in itself. Proper grip, stance, and nailing methods are essential to ensure both the safety of the roofer and the integrity of the project. Adhering to best practices not only expedites the roofing process but also contributes to the longevity and durability of the roof.
Maintaining the roofing hammer is a practice often overlooked but of significant consequence. Regular cleaning, rust prevention, and inspection of the handle and head ensure that the tool remains in optimal condition, ready for use in subsequent projects.
Safety should always be paramount when working with roofing hammers. Adequate eye protection, vigilance in avoiding overstrikes, and safe storage practices are indispensable aspects of responsible tool handling.
The roofing hammer is not merely a tool, but a cornerstone of excellence in roofing craftsmanship. By understanding its intricacies, selecting the right type, mastering its use, and maintaining it diligently, roofers can transcend the ordinary, delivering projects of unparalleled quality. With an eye toward the future, embracing advancements in tool technology ensures that the roofing experience continues to evolve, setting new standards of excellence in the industry. Elevate your roofing endeavors by choosing, using, and caring for your roofing hammer with the diligence and expertise it deserves.