Homemade Bug Zapper
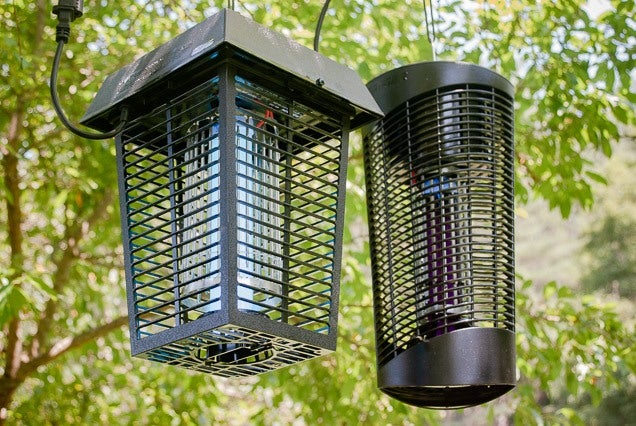
A homemade bug zapper, also known as a DIY bug zapper, is an electronic insect killer that you can make at home using readily available materials and tools. These homemade zappers use ultraviolet light to attract and electrocute flying insects, making them an effective and cost-efficient alternative to commercial bug zappers. There are different types of homemade bug zappers, such as the basic homemade bug zapper, which uses a UV light bulb, transformer, and metal grid, or the homemade fly zapper, which uses a combination of UV light, heat, and a sticky surface to trap and kill flying insects. Building a homemade bug zapper is a simple and easy project that can be done by anyone with basic knowledge of electronics.
Since the available chemical pesticides in market can be dangerous and harmful to the environment, many people are looking for alternative ways to control bug populations. One solution is to build a homemade bug zapper, an electrical device that attracts and kills insects.
Problem of Insect Infestations
Insects are a problem not only for the homeowners but can also damage crops, spread disease, and be a nuisance to people. Common household insects include mosquitoes, flies, and moths. Mosquitoes can spread diseases such as malaria, dengue fever and Zika virus. Flies and other insects can spread food-borne illnesses and can contaminate food. Moths can damage clothes and other fabrics. Chemical pesticides can be effective in controlling these insects, but they can also be harmful to the environment and to human health.
How to Make Homemade Bug Zapper?
List of materials needed to build the bug zapper:
- High-voltage power supply, such as a neon sign transformer or a bug zapper transformer
- Electrodes, typically made of metal wire or rod
- Grid, usually made of metal mesh or screen
- Housing materials, such as wood, plastic, or metal
- Electrical wire for connecting components
- Lightbulb or LED light (optional)
- Insulation materials, such as electrical tape or heat-shrink tubing
Electrical components like transformer and power supply are crucial to build the bug zapper. These are readily available in the market or can be purchased online. The electrodes and grid can be made with the available materials like metal wire or rod, metal mesh or screen. The housing can be made from wood, plastic or metal. The choice of material will depend on personal preference, but it’s important that the housing is sturdy and can withstand outdoor conditions. The electrical wire is needed to connect the components and a lightbulb or LED light is an optional addition. Insulation materials like electrical tape or heat-shrink tubing are also necessary to protect the wires and connections from moisture and other environmental elements.
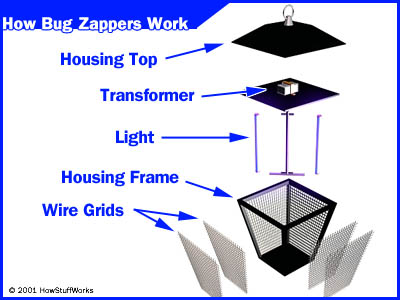
Courtesy – HowStuffWorks
Tools Needed for Assembly:
- Wire cutters
- Soldering iron
- Drill (if using wood or plastic for the housing)
- Screwdriver or other fastening tools (if using wood or plastic for the housing)
- Needle-nose pliers
- Safety goggles and gloves
Wire cutters are needed to cut the electrodes and the electrical wire. Soldering iron is used to connect the wires and components. If the housing is made from wood or plastic, then a drill and screwdriver or other fastening tools are necessary. Needle-nose pliers are used to bend and shape the electrodes and grid. Safety goggles and gloves are important for protecting the eyes and hands during the assembly process.
Making of the Homemade Zapper?
Step 1 – Building the electrical circuit
Wiring the transformer and high-voltage power supply:
The first step in building your homemade bug zapper is to create the electrical circuit. The circuit will consist of a transformer, a high-voltage power supply, and electrodes. To wire the transformer and power supply, you will need to connect the primary coil of the transformer to the power supply and the secondary coil to the electrodes. It’s essential to use the correct gauge wire for this step, as using wire that is too thin can cause the circuit to overload and potentially cause a fire.
Connecting the electrodes and grid:
Once the transformer and power supply are wired, the next step is to connect the electrodes to the circuit. The electrodes will be the parts of the bug zapper that deliver the electric shock to the insects, so it’s crucial that they are correctly connected. To do this, connect the electrodes to the secondary coil of the transformer using insulated wire. Then, attach the electrodes to the grid, which will be the physical barrier that separates the insects from the rest of the circuit.
Testing the circuit for proper function:
Before proceeding to the next step, it’s crucial to test the circuit to ensure that it is functioning correctly. To do this, connect the power supply to a power source and turn it on. The electrodes should produce a spark when they are touched, indicating that the circuit is working properly. If there is no spark or the circuit is not functioning correctly, double-check all of your connections and make sure that you have used the correct gauge wire.
Step 2 – Building the housing
Choosing the appropriate materials for the housing:
The housing of the bug zapper serves as a protective barrier for the electrical components and also attracts insects. So, it’s crucial to choose the appropriate materials for the housing. You can use any material that is durable and waterproof, such as plastic or metal. Some people also use wood for the housing, but it needs to be sealed properly to make it waterproof.
Cutting and assembling the housing:
Once you have chosen the appropriate material for the housing, you can start cutting and assembling it. Using the appropriate tools, such as a saw or a drill, cut the material to the desired size and shape. Then, assemble the housing using screws or glue, making sure that all of the pieces fit snugly together.
Attaching the electrical components to the housing:
Once the housing is assembled, the next step is to attach the electrical components to the housing. To do this, drill holes in the housing for the electrodes and power supply, then insert the electrodes and power supply into the holes. Make sure that the electrodes are securely attached to the housing and that the power supply is easily accessible for connecting to a power source.
Step 3 – Installing and maintaining the bug zapper
Tips on where to place the bug zapper for maximum effectiveness:
To get the most out of your homemade bug zapper, it’s essential to place it in an area where there are many insects. The ideal location is near a light source, as many insects are attracted to light. You can also place it near areas where you typically find insects, such as near a garbage can or near a flower bed.
How to safely operate the homemade zapper:
It’s important to follow proper safety precautions when operating your homemade bug zapper. Make sure that the power supply is disconnected before cleaning or maintaining the bug zapper. Also, avoid touching the electrodes while the bug zapper is in operation, as they can deliver a strong electric shock.
Cleaning and maintaining the bug zapper to ensure it continues to function properly:
Regular cleaning and maintenance are essential for ensuring that your homemade bug zapper continues to function properly. To clean the bug zapper, first, disconnect the power supply and remove any debris or insects that have accumulated in or around the electrodes. Use a damp cloth to wipe down the housing and electrodes. To maintain the bug zapper, check the connections and wiring for any damage and repair or replace as necessary. Also, check the power supply and replace it if it is no longer functioning properly. It is also important to check the grid and electrodes for any wear or damage and replace them if necessary. Regular cleaning and maintenance will ensure that your bug zapper continues to function at its best and keep your house and surroundings bug-free.
Video Tutorial of Homemade Bug Zapper
Benefits of using a homemade bug zapper
One of the main benefits of using a homemade bug zapper is that it is a cost-effective solution for controlling insect infestations. Compared to purchasing a commercial bug zapper, building one at home can save a significant amount of money. Additionally, a homemade bug zapper can be customized to meet the specific needs of the user, such as the size and placement of the unit. Another benefit is that it is environmentally friendly, as it does not use chemicals or pesticides that can harm other living organisms.
Use of Homemade Bug Zapper in Conjunction with other Methods
In addition to using a homemade bug zapper, there are other ways to effectively control insect infestations. One of the most important things to do is to keep the area clean and eliminate potential breeding sites for insects. This includes disposing of garbage properly, cleaning up spills and crumbs, and regularly cleaning surfaces. Another way to control insects is to use natural repellents, such as essential oils or herbs. Additionally, sealing up any cracks or openings in the home can help to prevent insects from entering. It is also important to note that a homemade bug zapper should not be the only solution for controlling insect infestations, it should be used in conjunction with other methods for best results. It is also important to be aware of the local regulations and laws regarding the use of bug zapper in your area.
We have provided a detailed guide on how to make a homemade bug zapper, including a list of materials and tools needed, step-by-step instructions on building the electrical circuit and housing, and tips on how to install and maintain the bug zapper. We also highlighted the importance of insect infestations and the need for effective control methods.
Pingback: Mosquito Attracting Light - Bug Zapper - New Home Tools