Drill Bit Sharpening Techniques
Drill bit sharpening techniques are important skills for anyone who works with drills regularly, as it can extend the life of your drill bits and improve their performance. There are several techniques and methods for sharpening drill bits, and the choice of technique depends on the tools you have and your level of expertise. Here are some common drill bit sharpening techniques:
Bench Grinder Method
The bench grinder method is a traditional and widely used technique for sharpening drill bits. To effectively sharpen your drill bits using a bench grinder, follow these detailed steps:
- Safety Precautions:
- Before you start, ensure you’re wearing safety glasses or a face shield to protect your eyes from flying debris. Wear appropriate clothing to prevent loose clothing from getting caught in the grinder.
- Prepare Your Bench Grinder:
- Start by setting up your bench grinder in a secure location. Make sure it is firmly anchored to a workbench or another stable surface.
- Tool Rest and Angle Adjustment:
- Examine the tool rest on your grinder. It should be in good condition and firmly locked in place. The tool rest is essential for maintaining the correct angle while sharpening.
- For most general-purpose drill bits, the ideal angle to sharpen is around 59 degrees. You can use a protractor or an angle gauge to set the tool rest at the correct angle. Make sure it’s precisely adjusted to this angle.
- The tool rest should also be set at the same height as the center of the grinding wheel. This ensures that you’ll be grinding at the correct point on the drill bit’s cutting edge.
- Grinding Wheel Selection:
- Choose the appropriate grinding wheel for your bench grinder. For sharpening drill bits, a fine-grit aluminum oxide wheel is commonly used. The wheel should be in good condition and free of any damage or irregularities.
- Secure Your Drill Bit:
- Hold the drill bit securely using a clamp or a dedicated sharpening jig if you have one. Make sure the bit is stable and won’t move while you’re sharpening.
- Grinding Process:
- Turn on the bench grinder and wait for it to reach full speed. This ensures a smoother and more controlled sharpening process.
- Hold the drill bit with both hands, positioning the cutting edge against the grinding wheel. Ensure that the bit’s flutes are parallel to the wheel’s surface.
- Apply even pressure while maintaining the angle of the bit against the wheel. The cutting edge should touch the wheel evenly across its entire width. Be patient and don’t press too hard, as this can lead to excessive heat buildup.
- Make a few passes across the wheel while maintaining the angle, and then release the pressure to check your progress. You should see a small, consistent bevel forming on the cutting edge.
- Rotate the bit 180 degrees after each pass to ensure an even grind on both sides. This helps maintain the bit’s balance and cutting performance.
- Cooling and Inspection:
- Periodically dip the drill bit in a container of water to cool it down and prevent overheating. Overheating can cause the bit to lose its temper and become less effective.
- After sharpening, inspect the cutting edges to ensure they are symmetrical and sharp. You can do this visually or by gently feeling the edge with your fingertips.
- Test the Sharpened Bit:
- To verify the quality of the sharpening job, make a test hole in a piece of scrap material. If the bit cuts cleanly and easily, you’ve successfully sharpened it.
- Final Checks and Storage:
- Double-check the sharpness and symmetry of the bit’s cutting edges. If adjustments are needed, repeat the sharpening process.
- Once you’re satisfied with the results, remove the bit from the clamp or jig and store it properly to prevent damage.
Sharpening drill bits with a bench grinder may take some practice to master, but with patience and attention to detail, you can keep your bits in excellent working condition, which is essential for precise drilling tasks.
Drill Doctor
The Drill Doctor is a dedicated tool designed to simplify the process of sharpening drill bits. It’s a handy device that is especially useful for those who want a quick and accurate method of sharpening drill bits without the need for extensive manual skills. Here are the key details:
-
- Purpose: The primary purpose of a Drill Doctor is to restore and sharpen drill bits that have become dull due to regular use. By doing so, it helps maintain the cutting performance and longevity of your drill bits.
- Operation: The Drill Doctor operates by securing the drill bit in a chuck and then guiding it along a predetermined path to grind and sharpen the cutting edges. This is typically done using a grinding wheel or abrasive surface.
- Angle Guidance: One of the most significant advantages of a Drill Doctor is its ability to maintain the correct sharpening angle. Most Drill Doctor models allow you to select the desired sharpening angle, typically around 118 degrees for general-purpose bits. The tool’s design ensures that the bit is consistently sharpened at this angle.
- Ease of Use: Drill Doctors are designed to be user-friendly, making them accessible to both professionals and DIY enthusiasts. You don’t need advanced sharpening skills to use one effectively.
- Specific Models: There are different models of Drill Doctor, and each may have unique features or methods of operation. It’s crucial to follow the manufacturer’s instructions provided with your specific Drill Doctor model to ensure correct usage and safety.
- Benefits: Using a Drill Doctor can save time and money, as it provides a quick and accurate way to sharpen drill bits, preventing the need for frequent replacements. The sharpened bits also result in cleaner and more efficient drilling.
Sharpening Jigs
Sharpening jigs are devices or accessories designed to assist in sharpening drill bits and other cutting tools. They serve as a guide to maintain the proper sharpening angle, making the process more accessible and accurate for users. Here are some important details:
-
- Purpose: Sharpening jigs are used to maintain the correct angle while sharpening drill bits. They are especially valuable when you want precise results but lack the experience to manually hold and sharpen the bit accurately.
- Angle Maintenance: These jigs are typically designed with a platform or holder that keeps the drill bit at the desired sharpening angle, such as 118 degrees for standard bits. By securing the bit in the jig, you can ensure consistent and accurate sharpening.
- Compatibility: Sharpening jigs are available for a range of drill bit sizes, so you can find one that suits your specific needs. Some jigs are adjustable, allowing you to accommodate various bit sizes.
- Instructions: Commercial sharpening jigs usually come with detailed instructions. These instructions provide guidance on how to set up the jig and effectively use it for sharpening drill bits. Following these instructions is crucial for achieving the best results.
- Versatility: In addition to drill bits, sharpening jigs can be used for other cutting tools like chisels and plane blades, making them versatile tools for woodworking and metalworking enthusiasts.
- User-Friendly: Sharpening jigs are generally user-friendly, and they are particularly helpful for beginners who may not have the experience or confidence to manually sharpen drill bits.
- Accuracy: Using a sharpening jig ensures that the drill bit’s cutting edges are sharpened evenly and consistently, resulting in improved drilling performance.
Whether you choose a Drill Doctor or a sharpening jig, both options are valuable for maintaining the performance and longevity of your drill bits. The choice often comes down to personal preference, skill level, and the specific needs of your projects.
Hand Sharpening with a File
Hand sharpening with a file is a traditional method for sharpening drill bits. It requires some skill and practice, but it can be effective when done correctly. Here’s a detailed guide on how to hand sharpen a drill bit using a file:
- Safety Precautions: Before you begin, always wear safety glasses to protect your eyes from any metal filings that may come off during the sharpening process. Additionally, secure the drill bit in a vise to ensure stability.
- Determine the Correct Angle: Most general-purpose drill bits have a standard point angle of 118 degrees. However, for hand sharpening, a slightly simpler angle of 59 degrees is often used. This is because you need to maintain half of the total point angle. If you are unsure about the angle, use a protractor to measure or consult the manufacturer’s specifications.
- Secure the Drill Bit: Place the drill bit in the vise, ensuring that the cutting edge is facing outward and easily accessible for sharpening. The drill bit should be positioned at the desired angle, which is usually 59 degrees for this method.
- File Selection: Choose a flat or triangular file for sharpening. A diamond file is ideal, but a regular metal file can also work. Make sure the file is clean and free from any debris that could scratch or damage the bit.
- Begin Sharpening: Holding the file at the correct angle, make gentle, even strokes along one of the cutting edges. The key is to maintain the desired angle consistently. It’s important to use even pressure throughout the sharpening process to avoid creating uneven or unevenly shaped cutting edges.
- Rotate the Bit: After a few strokes, rotate the bit slightly, ensuring that you sharpen the entire edge evenly. Continue this process until you have created a sharp cutting edge along one side of the bit.
- Repeat on the Other Side: Once one side is sharp, flip the bit in the vise and repeat the same process on the opposite side. This is crucial for maintaining symmetry and balance in the drill bit.
- Check Sharpness: After sharpening both sides, check the sharpness of the drill bit by running your finger lightly along the cutting edges. Be cautious, as a properly sharpened bit can be quite sharp. You can also test the bit on a piece of scrap material to see how it performs.
- Deburring: To complete the process, use a deburring tool or another file to remove any burrs or rough edges that may have formed during sharpening. A smooth, sharp edge is essential for clean drilling.
Drill Sharpening Machines
Drill sharpening machines are ideal for professional settings or workshops where precise and consistent results are essential. These machines automate the sharpening process, making it easier and faster. Here’s a thorough overview of drill sharpening machines:
- Machine Setup: Drill sharpening machines typically consist of a motor, a grinding wheel, and a jig or guide to hold the drill bit at the correct angle. Begin by setting up the machine according to the manufacturer’s instructions, ensuring it is securely mounted on a stable workbench or stand.
- Select the Correct Jig: Different types of drill bits have varying point angles. Select the appropriate jig or setting for your specific drill bit, usually indicated in degrees. The machine may come with a variety of jigs for different angles.
- Secure the Drill Bit: Place the drill bit in the jig or holder, ensuring that it is properly centered and secured. The machine’s design will guide the bit into the correct sharpening position.
- Adjust the Grinding Wheel: Depending on the machine, you may need to adjust the position of the grinding wheel to match the required point angle. Ensure that the grinding wheel is sharp and in good condition.
- Start the Machine: Turn on the sharpening machine, and let the grinding wheel rotate at a steady speed. Some machines have adjustable speed settings, so ensure it is set correctly for your specific bit.
- Sharpening Process: Insert the drill bit into the jig, and the machine will automatically guide it into the grinding wheel. The wheel will grind the cutting edges to the correct angle. Some machines have settings for the amount of material to be removed; follow the manufacturer’s recommendations.
- Coolant (Optional): In some machines, there is a built-in coolant system to prevent overheating. If your machine has this feature, make sure it’s functioning properly to prevent damage to the drill bit’s temper.
- Repeat if Necessary: For severely worn or damaged bits, you may need to run them through the machine several times to achieve the desired sharpness.
- Check Sharpness: After sharpening, check the sharpness and quality of the drill bit by performing a test drill on a scrap piece of material. The bit should perform as well as a new one.
- Final Touches: If any burrs or rough edges are present, use a deburring tool or file to remove them, ensuring the drill bit is smooth and clean.
Sharpening Stones for Drill Bit Sharpening
Sharpening stones are a versatile and cost-effective way to sharpen drill bits by hand. Here’s a detailed guide on how to use sharpening stones for this purpose:
Materials Needed:
- Sharpening stone or diamond hone: You can use either oil stones or water stones, depending on your preference.
- A flat, stable surface: Place the stone on a bench or table.
- Protective gear: Safety glasses to protect your eyes.
Procedure:
- Prepare the Stone:
- Ensure your sharpening stone is clean and free from debris or old metal shavings. If you are using an oil stone, lubricate it with a few drops of honing oil.
- If you’re using a water stone, soak it in water for the recommended time mentioned in the manufacturer’s instructions.
- Set the Correct Angle:
- The angle at which you hold the drill bit is crucial. For most general-purpose drill bits, the correct angle is around 59 degrees. You can use a protractor or a drill bit sharpening guide to maintain the correct angle.
- Start Sharpening:
- Hold the drill bit firmly with both hands, maintaining the correct angle.
- Use a circular motion while applying even pressure. Start from the back of the cutting edge and work your way towards the tip.
- Rotate the bit slightly after a few passes to ensure an even grind on both sides.
- Check Progress:
- Periodically stop and examine the cutting edge. Look for a clean, sharp edge that glistens in the light. Continue sharpening until you achieve the desired sharpness.
- Deburring:
- Once you’re satisfied with the sharpness, remove any burrs on the cutting edge. You can do this by lightly running the drill bit over the stone’s edge without maintaining the angle, or by gently honing the burrs with a few strokes.
- Clean and Store:
- Clean the sharpening stone of any metal shavings or residue. If you used honing oil, wipe it off.
- Store the stone in a dry and cool place to prevent it from deteriorating.
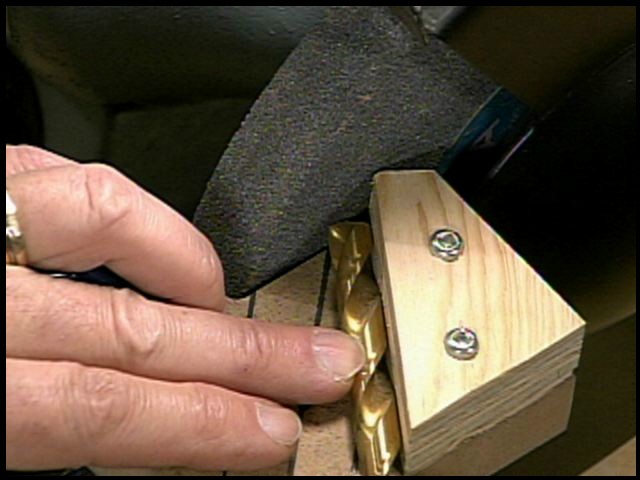
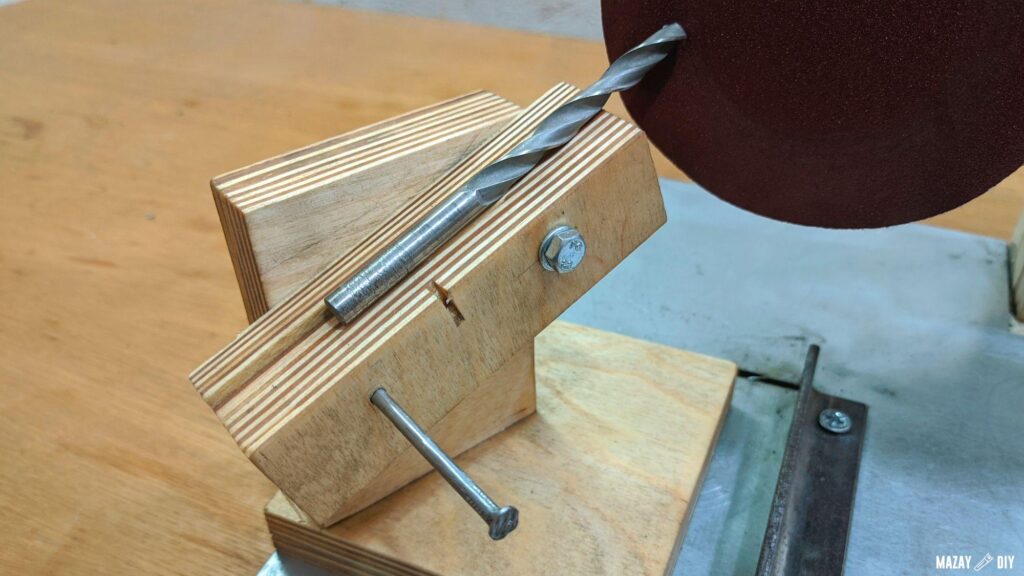
DIY Jig for Drill Bit Sharpening
A DIY jig is a helpful tool for maintaining the correct sharpening angle when using a file or sharpening stone. Here’s a detailed guide on creating and using a DIY jig:
Materials Needed:
- Piece of wood or metal: Select a sturdy material for the base of your jig.
- Protractor or angle measuring tool: To accurately set the correct sharpening angle.
- Clamps: To secure the drill bit and jig in place.
- Safety glasses: For eye protection.
Procedure:
- Prepare the Jig:
- Cut the piece of wood or metal into a rectangular shape that’s easy to handle.
- Attach a protractor or angle measuring tool to the jig to set the correct sharpening angle. This angle should match the angle of your drill bit, typically around 59 degrees for general-purpose bits.
- Secure the Jig:
- Clamp the jig securely to your workbench or table.
- Position the Drill Bit:
- Place the drill bit in the jig, ensuring it rests against the angled surface, matching the preset angle.
- Begin Sharpening:
- Use a sharpening stone or file to sharpen the drill bit. The jig will help you maintain the correct angle throughout the process.
- Inspect and Adjust:
- Periodically stop and inspect the drill bit’s edge. Make adjustments as needed to ensure even and symmetrical sharpening.
- Deburr and Clean:
- After sharpening, remove any burrs and clean the drill bit.
By using a DIY jig, you can maintain a consistent sharpening angle, which is crucial for achieving an effective and long-lasting drill bit. The jig ensures precision and helps even beginners achieve professional-level results.
The art of drill bit sharpening is a valuable skill for anyone who regularly uses drills. Whether you opt for sharpening stones, a dedicated sharpening tool, or a DIY jig, the process is an essential aspect of maintaining the efficiency and longevity of your drill bits. A properly sharpened drill bit not only saves time and money but also ensures cleaner and more accurate holes. By following the appropriate techniques and safety precautions, one can master the art of drill bit sharpening and take on tasks with confidence, knowing that their tools are in optimal condition, ready to meet any challenge that comes their way.