
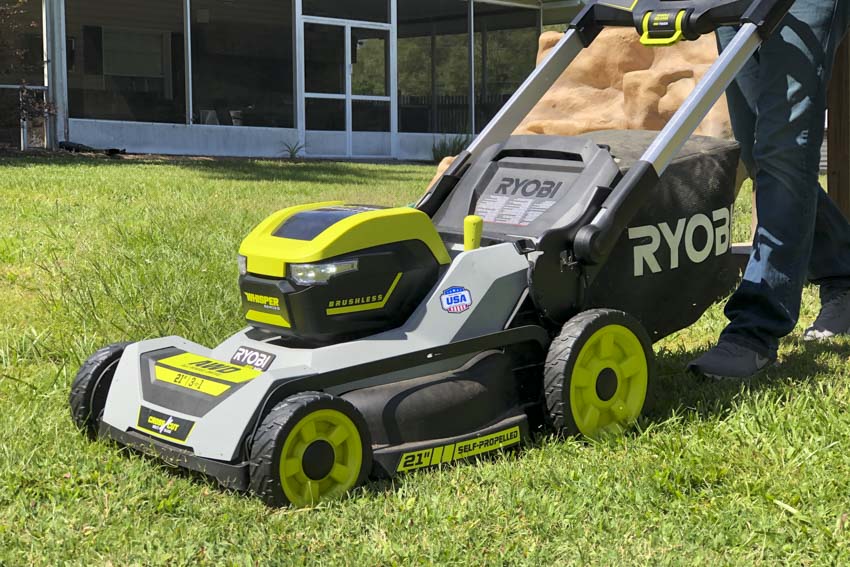
Brief Introduction to the 40V Ryobi Lawn Mower
The 40V Ryobi Lawn Mower represents a significant advancement in the realm of electric lawn care equipment. Manufactured by Ryobi, a reputable name in the power tool industry, this mower is designed to deliver both performance and convenience. Powered by a 40-volt lithium-ion battery, it offers an environmentally-friendly alternative to traditional gas-powered counterparts, while maintaining the necessary power to effectively mow lawns of varying sizes and terrains.
With a focus on user-friendly features and cutting-edge technology, the 40V Ryobi Lawn Mower has garnered attention for its capacity to provide a clean, precise cut, along with the added benefits of reduced noise levels and emissions. This innovation addresses the evolving needs of homeowners seeking an efficient and sustainable approach to lawn maintenance.
Importance of Efficient Lawn Maintenance
Efficient lawn maintenance is integral to preserving the aesthetic appeal and health of any outdoor space. A well-kept lawn not only enhances the visual appeal of a property but also contributes to a healthier ecosystem. It provides a comfortable and safe environment for recreational activities, promotes soil health, and assists in mitigating environmental issues such as erosion and runoff.
A meticulously maintained lawn can significantly increase property value and curb appeal. It creates a positive first impression for visitors and potential buyers, reflecting the care and attention invested in the overall upkeep of the property.
In the broader context, responsible lawn care practices contribute to a more sustainable environment. By adopting technologies such as the 40V Ryobi Lawn Mower, which operates on battery power, individuals can reduce their carbon footprint and minimize the impact of lawn maintenance on air quality and noise pollution levels. This shift towards eco-conscious lawn care aligns with contemporary efforts to adopt greener practices in various aspects of daily life.
Unpacking and Setting Up Your 40V Ryobi Lawn Mower
Contents of the Package
Upon receiving your 40V Ryobi Lawn Mower, it is essential to familiarize yourself with the contents of the package to ensure that all necessary components are present. The contents typically include:
- 40V Ryobi Lawn Mower Unit: This is the core component of the package, housing the motor, cutting deck, and control panel. It is designed with user-friendly features for ease of operation.
- 40V Lithium-Ion Battery: The mower is powered by a rechargeable 40V lithium-ion battery. This high-capacity battery provides ample power for efficient lawn mowing and is designed for extended runtime.
- Battery Charger: Included is a dedicated charger tailored to the 40V battery. This charger is equipped with safety features to ensure a reliable and secure charging process.
- Grass Bag or Mulching Plug: Depending on the specific model, your package will include either a grass bag for collecting clippings or a mulching plug for finely chopping and redistributing grass back into the lawn.
- User Manual and Documentation: A comprehensive user manual provides detailed instructions on assembly, operation, and maintenance of the mower. It is highly recommended to review this document thoroughly before commencing the setup process.
- Additional Accessories (if applicable): Depending on the specific variant of the 40V Ryobi Lawn Mower, additional accessories such as spare blades or adjustment tools may be included.
Step-by-Step Assembly Instructions
To ensure a seamless setup process, follow these step-by-step assembly instructions:
- Choose a Suitable Work Area: Select a flat, clean, and well-lit area to set up your mower. Ensure there is ample space to maneuver and access the necessary tools.
- Attach the Handle: Begin by attaching the handle to the mower deck using the provided hardware. Ensure that the handle is securely fastened, and the adjustment knobs are tightened appropriately.
- Install the Grass Bag or Mulching Plug: Depending on your preference and the type of grass disposal you intend to use, either attach the grass bag securely to the designated hooks or insert the mulching plug into the rear discharge chute.
- Insert the 40V Lithium-Ion Battery: Slide the fully charged 40V lithium-ion battery into the designated compartment on the mower. Ensure it clicks into place to establish a secure connection.
- Inspect and Adjust the Cutting Height (Optional): If you have specific preferences for grass height, utilize the provided adjustment options to set the cutting height to your desired level.
- Safety Check: Prior to starting the mower, perform a thorough safety check. Ensure all components are securely fastened, and there are no obstructions around the cutting deck.
- Refer to the User Manual: If you encounter any uncertainties during the assembly process, consult the user manual for detailed diagrams and instructions.
- Charging the Battery (if required): If the battery is not pre-charged, connect it to the provided charger and follow the instructions outlined in the user manual to initiate the charging process.
By following these step-by-step instructions, you will ensure that your 40V Ryobi Lawn Mower is assembled correctly and ready for efficient operation in your lawn care endeavors. Always prioritize safety and refer to the user manual for any specific model nuances.
Overview of the Control Panel and Features
Upon acquiring the 40V Ryobi Lawn Mower, it is essential to familiarize oneself with its control panel and accompanying features. This control interface serves as the operational hub of the mower, allowing users to efficiently navigate through various functionalities.
- Power Switch: Positioned prominently on the control panel, the power switch is the primary means of activating and deactivating the mower. To power the unit, simply engage the switch, ensuring that it is firmly set to the “ON” position. Conversely, to power down the mower, return the switch to the “OFF” position.
- Safety Key: Complementing the power switch is the inclusion of a safety key mechanism. This serves as an additional safety measure to prevent unintended activation. The safety key must be inserted into the designated slot before the mower can be powered on. This feature is pivotal in maintaining a secure mowing environment.
- Handle Controls: Positioned ergonomically within arm’s reach, the handle controls facilitate seamless operation of the mower during use. These controls typically encompass functions such as engaging the blade for cutting, adjusting the cutting height, and managing the propulsion system, if applicable.
- Battery Indicator: A pivotal feature integrated into the control panel is the battery status indicator. This visual gauge provides real-time feedback on the remaining charge level of the 40V lithium-ion battery. Keeping a vigilant eye on this indicator ensures that the mower is adequately charged for uninterrupted operation.
- Safety Features: Additionally, the control panel may house various safety features, including but not limited to, emergency stop buttons or levers. These serve as fail-safes to promptly halt mower operation in the event of an unforeseen circumstance.
Familiarizing Yourself with the Battery and Its Charging Process
Understanding the intricacies of the 40V lithium-ion battery and its charging procedure is imperative for optimal mower performance.
- Battery Installation: The 40V Ryobi Lawn Mower is equipped with a lithium-ion battery that slots securely into a designated compartment. Prior to operation, ensure the battery is correctly inserted and locked into place, guaranteeing a reliable power supply.
- Charging Procedure: When the battery requires recharging, employ the provided charger designed specifically for the 40V Ryobi battery. Connect the charger to a suitable power source and insert the battery for recharging. The charger typically features LED indicators to signify the progress of the charging process.
- Charging Time: It is worth noting that the 40V lithium-ion battery exhibits efficient charging characteristics. Under normal conditions, a complete charge cycle is typically achieved within a reasonable timeframe. It is advised to consult the manufacturer’s guidelines for precise charging duration.
- Storage and Maintenance: To prolong the longevity of the battery, adhere to recommended storage and maintenance practices outlined in the user manual. Avoid exposing the battery to extreme temperatures and ensure periodic charging, particularly during extended periods of inactivity.
Tips for Optimal Cutting Height and Technique
Maintaining an appropriate cutting height is paramount to achieving a healthy and visually appealing lawn. The 40V Ryobi Lawn Mower offers adjustable cutting heights to accommodate various grass lengths, ensuring an even and well-groomed result. Here are some essential tips for achieving an optimal cutting height:
- Seasonal Adjustments: As seasons change, so do the growth patterns of different grass types. During cooler months, it is advisable to set the cutting height slightly higher to promote root health and withstand potential stressors. Conversely, in warmer months, a slightly lower cutting height may be appropriate to maintain an aesthetically pleasing appearance.
- Avoid Scalping: Scalping, or cutting the grass too short, can lead to stress, discoloration, and vulnerability to pests and diseases. It is recommended to avoid removing more than one-third of the grass blade’s length in a single mowing session.
- Consider Turf Type: Different grass species thrive at varying heights. For example, warm-season grasses such as Bermuda and Zoysia prefer shorter cuts, while cool-season grasses like Kentucky Bluegrass and Fescue thrive with slightly taller blades.
- Gradual Adjustments: If transitioning to a different cutting height, it is advisable to make gradual adjustments over several mowing sessions. Abrupt changes can shock the grass and impede its ability to recover.
- Maintain Sharp Blades: Dull blades tear grass rather than cleanly cutting it, which can lead to a frayed appearance and increase susceptibility to disease. Regularly inspect and sharpen the mower blades to ensure a clean, precise cut.
Recommendations for Different Grass Types and Weather Conditions
Understanding the specific needs of your grass type and adapting your mowing routine to prevailing weather conditions are crucial aspects of effective lawn care. Here are tailored recommendations for various grass types and weather scenarios:
- Warm-Season Grasses (e.g., Bermuda, Zoysia, Centipede):
- Optimal Cutting Height: 1 to 1.5 inches
- Mow Frequency: Every 5-7 days during active growth periods
- Drought Tolerance: These grasses are resilient to heat and drought, but deeper, infrequent watering is still advisable.
- Cool-Season Grasses (e.g., Kentucky Bluegrass, Fescue, Ryegrass):
- Optimal Cutting Height: 2.5 to 3.5 inches
- Mow Frequency: Every 7-10 days, adjusting as necessary during periods of rapid growth.
- Adequate Watering: Maintain consistent moisture levels, especially during dry spells.
- Adverse Weather Conditions:
- High Temperatures: Avoid mowing during the hottest part of the day. Opt for early morning or late afternoon sessions to minimize stress on the grass.
- Wet Conditions: Mowing wet grass can lead to clumping and an uneven cut. It is advisable to wait until the grass is dry before mowing.
Customizing Your Mowing Experience
The 40V Ryobi Lawn Mower is designed with a range of features that allow users to tailor their mowing experience to the specific needs and preferences of their lawn. Two key aspects to consider in this customization process are the cutting height adjustment options and the choice between mulching, bagging, and side discharge. These elements collectively contribute to achieving an optimal and aesthetically pleasing lawn appearance.
Exploring the Cutting Height Adjustment Options
One of the fundamental elements of achieving a well-maintained lawn is to ensure that the grass is cut to an appropriate height. The 40V Ryobi Lawn Mower offers users the ability to adjust the cutting height to various levels, providing flexibility for accommodating different grass species and growth conditions. This feature is particularly valuable as it allows for precision in achieving the desired grass height, which can have a direct impact on the overall health and appearance of the lawn.
The cutting height adjustment mechanism on the 40V Ryobi is user-friendly and intuitive. It typically involves a simple lever or dial system that allows for quick and easy modification of the cutting height. The mower provides multiple height settings, ranging from a shorter, more manicured cut for formal lawns, to a slightly higher cut suitable for longer grass or less formal landscaping. This adaptability ensures that users can maintain their lawn at an optimal length for both aesthetic and functional purposes.
Additionally, the ability to adjust the cutting height allows for seasonal variations in grass growth. For instance, during periods of rapid growth in the spring, a higher cutting height may be preferred to prevent scalping and encourage a healthier root system. Conversely, in drier or slower growth periods, a shorter cut may be appropriate to maintain a neat and uniform appearance.
Choosing Between Mulching, Bagging, and Side Discharge
The 40V Ryobi Lawn Mower offers users a range of options for managing the clippings produced during mowing. These options include mulching, bagging, and side discharge. Each method serves a distinct purpose and can be selected based on the specific needs of the lawn and personal preferences.
- Mulching: Mulching involves finely chopping the grass clippings and dispersing them back onto the lawn. This process returns valuable nutrients to the soil, acting as a natural fertilizer. Mulching also aids in moisture retention and weed suppression, promoting a healthier and more resilient lawn. The 40V Ryobi’s mulching feature is highly effective, ensuring that clippings are finely cut and evenly distributed across the lawn surface.
- Bagging: For those who prefer a pristine, debris-free lawn surface, the bagging option allows clippings to be collected in an attached bag for disposal. This is particularly useful in situations where grass growth has been excessive, or when aesthetic considerations necessitate a tidy appearance. The 40V Ryobi’s bagging system is designed for efficient collection and ease of disposal, minimizing the need for frequent emptying.
- Side Discharge: The side discharge option expels clippings to the side of the mower for uniform dispersal across the lawn. This can be advantageous in areas where grass growth is particularly dense or during times of heavy mowing. The 40V Ryobi’s side discharge mechanism ensures a consistent and controlled ejection of clippings.
By offering these three distinct mowing options, the 40V Ryobi Lawn Mower empowers users to choose the method that best aligns with their specific lawn care goals, whether they prioritize nutrient-rich mulching, a pristine appearance through bagging, or efficient grass disposal via side discharge.
Maintaining Your 40V Ryobi Lawn Mower
Maintaining your 40V Ryobi Lawn Mower is essential to ensure optimal performance and longevity. Proper maintenance practices will not only extend the life of the mower but also contribute to a more efficient and effective lawn care experience. Below, we will discuss key steps and recommendations for maintaining your 40V Ryobi Lawn Mower in detail.
- Regular Cleaning: Regular cleaning is a fundamental aspect of mower maintenance. After each use, it is imperative to remove grass clippings, debris, and any accumulated dirt from the cutting deck, undercarriage, and other accessible areas. A clean mower not only operates more efficiently but also minimizes the risk of corrosion and damage to critical components.
- Inspecting Blades and Cutting Deck: Inspecting the blades and cutting deck is paramount to achieving a clean and precise cut. Check the blades for signs of wear, dullness, or damage, and sharpen or replace them as necessary. Additionally, ensure the cutting deck is free from any obstructions or debris that may impede the mower’s performance.
- Checking the 40V Lithium-Ion Battery: The 40V lithium-ion battery is the powerhouse of your mower, providing the necessary energy for operation. Regularly inspect the battery for any visible signs of damage or wear. Additionally, monitor its charge level and recharge as needed. Store the battery in a cool, dry place when not in use, and avoid exposing it to extreme temperatures.
- Maintaining Tire Pressure: Proper tire pressure is crucial for maneuverability and even cutting. Periodically check and adjust the tire pressure according to the manufacturer’s recommendations. Overinflated or underinflated tires can lead to uneven cutting and additional strain on the mower’s motor.
- Adjusting Cutting Height: Depending on the season and grass type, it may be necessary to adjust the cutting height of the mower. Ensuring the blades are set at the appropriate height not only promotes healthier grass growth but also prevents unnecessary strain on the motor.
- Inspecting Cables and Belts: Inspect the cables and belts connecting various components of the mower. Look for signs of fraying, wear, or tension issues. Replace any damaged or worn parts promptly to maintain optimal performance.
- Lubricating Moving Parts: Proper lubrication of moving parts, such as wheels, axles, and pulleys, is essential for reducing friction and preventing premature wear. Use a high-quality lubricant recommended by the manufacturer at specified intervals.
- Replacing Air Filters: The air filter plays a critical role in preventing debris and contaminants from entering the engine. Check the air filter regularly and replace it if it appears dirty or clogged. A clean filter ensures optimal air intake for combustion.
- Addressing Fuel and Oil Levels (if applicable): If your mower has a separate engine requiring fuel and oil, ensure that both levels are adequate and within the recommended range. Use the appropriate fuel and oil types as specified in the user manual.
- Storing the Mower Properly: When not in use for extended periods, store the 40V Ryobi Lawn Mower in a clean, dry environment. It is advisable to cover the mower to protect it from dust and moisture.
Frequently Asked Questions
Q1: What is the runtime of the 40V Ryobi Lawn Mower on a single charge?
A1: The 40V Ryobi Lawn Mower is equipped with a high-capacity lithium-ion battery that provides a commendable runtime. On average, the mower can operate for approximately 30-45 minutes on a full charge, depending on various factors such as grass height, density, and terrain. It is worth noting that the actual runtime may vary slightly under different conditions.
Q2: How long does it take to fully charge the battery?
A2: The charging time for the 40V Ryobi Lawn Mower’s battery is relatively efficient. It typically takes about 90 minutes to 2 hours to achieve a full charge, depending on the initial state of the battery and the charging conditions. The charger is designed with safety features to prevent overcharging and extend the overall lifespan of the battery.
Q3: Can I adjust the cutting height of the mower?
A3: Yes, the 40V Ryobi Lawn Mower offers multiple cutting height options to accommodate various grass lengths and preferences. It is equipped with a user-friendly height adjustment mechanism that allows you to easily raise or lower the cutting deck to achieve the desired grass height. This feature ensures versatility in lawn maintenance and allows for a customized cutting experience.
Q4: Is the 40V Ryobi Lawn Mower suitable for larger lawns?
A4: While the 40V Ryobi Lawn Mower is capable of efficiently handling medium-sized lawns, it may not be the most suitable choice for very large properties. Due to the battery’s runtime limitations, users with extensive lawn areas may need to plan mowing sessions accordingly or consider having an extra fully charged battery on hand for uninterrupted operation.
Q5: How do I maintain and care for the 40V Ryobi Lawn Mower?
A5: Proper maintenance is essential for ensuring the longevity and optimal performance of the 40V Ryobi Lawn Mower. Regularly clean the cutting deck and remove any grass clippings or debris. Inspect the blades for sharpness and replace them as needed. Additionally, keep the battery terminals clean and avoid overexerting the mower on excessively thick or wet grass, as this may impact performance.
Q6: Can I use the 40V Ryobi battery with other Ryobi tools?
A6: Yes, the 40V Ryobi battery is part of Ryobi’s ONE+ system, which means it is compatible with a wide range of other Ryobi power tools within the same voltage class. This interchangeability allows users to leverage the battery across various outdoor and indoor tools, providing added convenience and versatility for those who already own other Ryobi products.
The 40V Ryobi Lawn Mower emerges as a cutting-edge solution, seamlessly blending power, efficiency, and environmental consciousness into the realm of lawn care. As we traverse the green landscapes of technology-driven gardening, this mower stands as a beacon of innovation. Its 40V lithium-ion battery not only delivers robust performance but also promotes a cleaner, quieter, and more sustainable approach to lawn maintenance. The convenience of cordless operation liberates users from the constraints of traditional electric mowers, offering a hassle-free and maneuverable experience. With adjustable cutting heights, a wide cutting deck, and mulching capabilities, the 40V Ryobi Lawn Mower caters to the diverse needs of lawn enthusiasts, ensuring a precisely manicured yard with every pass. The inclusion of smart features, such as load-sensing technology and collapsible handles for easy storage, further solidify its status as a user-friendly and forward-thinking lawn care companion. In essence, the 40V Ryobi Lawn Mower not only elevates the mowing experience but also paves the way for a greener and more efficient future in home gardening.